×

iFour Logo

OAuth Login Authentication with identity provider in Xamarin.Forms

Kapil Panchal - March 19, 2021

Listening is fun too.

Straighten your back and cherish with coffee - PLAY !
  • play
  • pause
  • pause
OAuth Login Authentication with identity provider in Xamarin.Forms

Many applications require the addition of user authentication, and this always means enabling your users to sign in to their existing Facebook, Yahoo, Google, and now Apple Pull sign-in accounts.

ai-Hiring-banner

https://docs.microsoft.com

OAuth is an authentication framework that allows the application to obtain limited access to HTTP service users' accounts on Facebook, Yahoo, Google, Microsoft, etc. Nowadays, there is no need to make registration logic. Alternatively, you can select the identity provider using the login. In this case, an individual sign up for the application using the identity provider's login, an account is created for them, and the authentication step is taken by the identity provider.

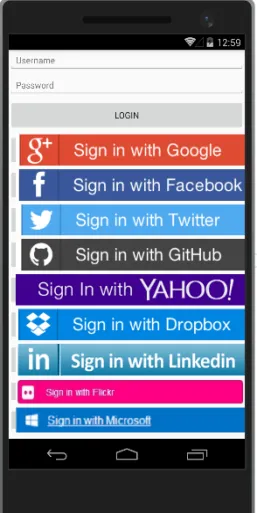
In this article, we will understand how to implement the following OAuth identity provider in Xamarin Forms and how to manage the authentication process in Xamarin.Forms application.

  1. Google
  2. Facebook
  3. Twitter
  4. Microsoft
  5. Linkedin


https://docs.microsoft.com ai-Hiring-banner


https://www.c-sharpcorner.com

Now let's go step by step how to create an OAuth Login form in Xamarin Android.

We are creating this project in Visual Studio 2019, so you too should try to use the latest versions.

Step 1 - Create New Xamarin.Forms Project


Open Visual Studio -> Create New Project -> Mobile App (Xamarin.form)

Then click on the Next button. Note the highlight point of the image as shown in the image. We are developing mobile phones so mobile phones have to be selected.

ai-Hiring-banner

Screenshot 1: Select new project

Step 2: Give the project name


You can give your project the name you want. Enter the name of your project and click on the create button our project name is OAuthLoginAuthentication which you can see in the image.

ai-Hiring-banner

Screenshot 2: Give project name

Step 3: Select template


From this, you can select whatever you want. All are templates, we only need a blank page then select the last option which will be a blank page.

If you need a Flyout layout you can also select the first option flyout drawer which will provide you a Flyout.

If you need a tab menu, you can also select the second option Tabbed App which will provide you a tab menu.Then click on Create

ai-Hiring-banner

Screenshot 3: Select template

Now our project is set up as a normal model. And, we will add a component, API class, layout, NuGet package, required class, and interface.

Step 4 - Install OAuth Client Components


Xamarin.Auth is an all-platform SDK to authenticate users and store their accounts. It has authenticators that provide support for the use of identity providers.

Let's add Xamarin.Auth component to OAuth. We have to add this separately to all platform-specific projects.

Go to Solution Explorer (Right -side) -> OAuthLoginAuthentication.Droid-> Components -> Right-click on select "Get More Components".

If you are not already logged in, the login page will be displayed. Then connect to it. Next, search for the Xamarin.Auth component and double-click and click "Add to App"

Step 5 - Create Base Login Page (SecuredLoginPage.Xaml)


We have created quick and easy login screens. You can change them as per your needs.

Go to Solution Explorer (Right -side)->Right-click on Portable Class Library - Add New Item - Select Xaml Page (SecuredLoginPage).


SecuredLoginPage.Xaml.cs

Add SecuredLoginPage event in SecuredLoginPage page code behind the file and the sender object will return the button text name (eg: Twitter, Yahoo, etc).

 
using System;
using Xamarin.Forms;  
namespace OAuthLoginAuthentication {  
    public partial class SecuredLoginPage: ContentPage {  
        public SecuredLoginPage() {  
            InitializeComponent();  
        }  
        void LoginClick(object sender, EventArgs args) {  
            Button btncontrol = (Button) sender;  
            string providername = btncontrol.Text;  
            if (OAuthConfig.User == null) {  
                Navigation.PushModalAsync(new ProviderLoginPage(providername));  
                
            }  
        }  
    }  
}

Step 6 - Create identity provider login page


As we will be implementing Xamarin.Auth platform-specific login page, we do not need any specific implementation in a portable project. We do not need to simply add the provider login page which will be resolved at runtime and will be replaced by actual implementation in this regard, which will be explained in step 7.

Right Click Portable Project -> Add New Item ->Select Xaml page (ProviderLoginPage.Xaml).

 
using System;
using Xamarin.Forms;  
namespace OAuthLoginAuthentication {  
    public partial class SecuredLoginPage: ContentPage {  
        public SecuredLoginPage() {  
            InitializeComponent();  
        }  
        void LoginClick(object sender, EventArgs args) {  
            Button btncontrol = (Button) sender;  
            string providername = btncontrol.Text;  
            if (OAuthConfig.User == null) {  
                Navigation.PushModalAsync(new ProviderLoginPage(providername));  
                
            }  
        }  
    }  
}

Step 7: Create Platform Specific Login Renderer


We need to create a platform-specific LoginRenderer Page. Thus, you need to create a specific login page (loginRenderer. CS) for iOS, Android, and UWP projects.

We need to add a Login page render that will be used by Xamarin.Auth to display the web view for the OAuth log-in page.


Code Snippet Explanation

The following code is for Xamarin.Forms Dependency service that maps the provider login page to a login renders.

 
using System;
using Xamarin.Forms;  
namespace OAuthLoginAuthentication {  
    public partial class SecuredLoginPage: ContentPage {  
        public SecuredLoginPage() {  
            InitializeComponent();  
        }  
        void LoginClick(object sender, EventArgs args) {  
            Button btncontrol = (Button) sender;  
            string providername = btncontrol.Text;  
            if (OAuthConfig.User == null) {  
                Navigation.PushModalAsync(new ProviderLoginPage(providername));  
                
            }  
        }  
    }  
}

Create an OAuthProviderSetting class from a portable class library by implementing OAuth. That is explained in step 8.

 
OAuthProviderSetting oauth = new OAuthProviderSetting();  
var auth = oauth.LoginWithProvider(providername);  
Create Oauth event  
for provider login completed and canceled.  
auth.Completed += (sender, eventArgs) => {  
        if (eventArgs.IsAuthenticated) { //Login Success }  
            else {  
                // The user canceled 
            }  
        };
		

If you want to retrieve and save user information. You can create a username from a portable library and refer to the code below.

 
namespace DevEnvExeLogin {  
    public class UserDetails {  
        public string TwitterId {  
            get;  
            set;  
        }  
        public string Name {  
            get;  
            set;  
        }  
        public string ScreensName {  
            get;  
            set;  
        }  
        public string Token {  
            get;  
            set;  
        }  
        public string TokenSecret {  
            get;  
            set;  
        }  
        public bool IsAuthenticated {  
            get {  
                return !string.IsNullOrWhiteSpace(Token);  
            }  
        }  
    }  
} 
		

Planning to Hire Xamarin App Development Company ? Your Search ends here.


LoginsRenderer.CS
[assembly: ExportRenderer(typeof(ProviderLoginPage), typeof(LoginsRenderer))]  
namespace DevEnvExeLogin.Droid.PageRender {  
	public class LoginRenderer: PageRenderer {  
		bool showLogin = true;  
		protected override void OnElementChangeds(ElementChangedEventArgs < Page > e) {  
			base.OnElementChanged(e);  
              
			var loginPage = Element as ProviderLoginPage;  
			string providername = loginPage.ProviderName;  
			var activity = this.Context as Activity;  
			if (showLogin && OAuthConfig.User == null) {  
				showLogin = false;  
                
				OAuthProviderSetting oauth = new OAuthProviderSetting();  
				var auth = oauth.LoginWithProvider(providername);  
              
				auth.Completed += (sender, eventArgs) => {  
					if (eventArgs.IsAuthenticated) {  
						OAuthConfig.User = new UserDetails();  
                       // Get and Save User Details   
                       OAuthConfig.User.Token = eventArgs.Account.Properties["oauth_token"];  
                       OAuthConfig.User.TokenSecret = 
eventArgs.Account.Properties["oauth_token_secret"];  
                        OAuthConfig.User.TwitterId = eventArgs.Account.Properties["user_id"];  
                        OAuthConfig.User.ScreenName = eventArgs.Account.Properties["screen_name"];  
                        OAuthConfig.SuccessfulLoginAction.Invoke();  
                    } else {  
                        // The user cancelled  
                    }  
                };  
                activity.StartActivity(auth.GetUI(activity));  
            }  
        }  
    }  
} 

Step 8: OAuth Implementation


The OAuth2Authenticator class is responsible for managing the user interface and interacting with authentication services. It will support all identity providers.

The OAuth2Authenticator and OAuth1Authenticator classes require some parameters, as shown in the list below.

Client ID- Identity provider-client ID. When registering the application, you will require a single client ID.

Secret Client – Identifies the client applying. When registering the application, you will need a unique customer privilege.

Scope – Identifies access to the API requested by the application, and the value informs the consent screen which is displayed to the user.

Authorize URL – Indicates the URL from which the permission code will be obtained.

Redirection URL – Identifies the URL from which the reply will be sent. The value of this parameter should correspond to one of the values displayed on the Project Identifiers page.

Access Token URL — Identifies the URL used to ask for access tokens after obtaining an authorization code.

Step 9: Google Account Login Data


var googleauth = new OAuth2Authenticator (  
"ClientId",  
"ClientSecret",  
"https://www.googleapis.com/auth/userinfo.email",  
new Uri("https://accounts.google.com/o/oauth2/auth"),  
new Uri ("http://www.myside.com"),new Uri("https://accounts.google.com/o/oauth2/token")  
); 

Note: We have just written the code about the google account here. If you need another account, you can follow the link below.

https://www.c-sharpcorner.com/article/oauth-login-authenticating-with-identity-provider-in-xamarin-forms/

You can also download source code from the other site.

Conclusion


In this blog, we have seen the normal code but you can also do it in MVVM depending on your project requirements. The samples shown here are the basis to implement authentication in your Xamarin Forms application. As we discussed in the blog, you can log in with any site for which you need Client ID or AppID and Client secret.

OAuth Login Authentication with identity provider in Xamarin.Forms Many applications require the addition of user authentication, and this always means enabling your users to sign in to their existing Facebook, Yahoo, Google, and now Apple Pull sign-in accounts. https://docs.microsoft.com OAuth is an authentication framework that allows the application to obtain limited access to HTTP service users' accounts on Facebook, Yahoo, Google, Microsoft, etc. Nowadays, there is no need to make registration logic. Alternatively, you can select the identity provider using the login. In this case, an individual sign up for the application using the identity provider's login, an account is created for them, and the authentication step is taken by the identity provider. In this article, we will understand how to implement the following OAuth identity provider in Xamarin Forms and how to manage the authentication process in Xamarin.Forms application. Google Facebook Twitter Microsoft Linkedin   https://docs.microsoft.com     https://www.c-sharpcorner.com Now let's go step by step how to create an OAuth Login form in Xamarin Android. We are creating this project in Visual Studio 2019, so you too should try to use the latest versions. Step 1 - Create New Xamarin.Forms Project Open Visual Studio -> Create New Project -> Mobile App (Xamarin.form) Then click on the Next button. Note the highlight point of the image as shown in the image. We are developing mobile phones so mobile phones have to be selected. Screenshot 1: Select new project Step 2: Give the project name You can give your project the name you want. Enter the name of your project and click on the create button our project name is OAuthLoginAuthentication which you can see in the image. Screenshot 2: Give project name Step 3: Select template From this, you can select whatever you want. All are templates, we only need a blank page then select the last option which will be a blank page. If you need a Flyout layout you can also select the first option flyout drawer which will provide you a Flyout. Read More: Page Navigation Between Two Pages In Xamarin.forms If you need a tab menu, you can also select the second option Tabbed App which will provide you a tab menu.Then click on Create Screenshot 3: Select template Now our project is set up as a normal model. And, we will add a component, API class, layout, NuGet package, required class, and interface. Step 4 - Install OAuth Client Components Xamarin.Auth is an all-platform SDK to authenticate users and store their accounts. It has authenticators that provide support for the use of identity providers. Let's add Xamarin.Auth component to OAuth. We have to add this separately to all platform-specific projects. Go to Solution Explorer (Right -side) -> OAuthLoginAuthentication.Droid-> Components -> Right-click on select "Get More Components". If you are not already logged in, the login page will be displayed. Then connect to it. Next, search for the Xamarin.Auth component and double-click and click "Add to App" Step 5 - Create Base Login Page (SecuredLoginPage.Xaml) We have created quick and easy login screens. You can change them as per your needs. Go to Solution Explorer (Right -side)->Right-click on Portable Class Library - Add New Item - Select Xaml Page (SecuredLoginPage). SecuredLoginPage.Xaml.cs Add SecuredLoginPage event in SecuredLoginPage page code behind the file and the sender object will return the button text name (eg: Twitter, Yahoo, etc).   using System; using Xamarin.Forms; namespace OAuthLoginAuthentication { public partial class SecuredLoginPage: ContentPage { public SecuredLoginPage() { InitializeComponent(); } void LoginClick(object sender, EventArgs args) { Button btncontrol = (Button) sender; string providername = btncontrol.Text; if (OAuthConfig.User == null) { Navigation.PushModalAsync(new ProviderLoginPage(providername)); } } } } Step 6 - Create identity provider login page As we will be implementing Xamarin.Auth platform-specific login page, we do not need any specific implementation in a portable project. We do not need to simply add the provider login page which will be resolved at runtime and will be replaced by actual implementation in this regard, which will be explained in step 7. Right Click Portable Project -> Add New Item ->Select Xaml page (ProviderLoginPage.Xaml).   using System; using Xamarin.Forms; namespace OAuthLoginAuthentication { public partial class SecuredLoginPage: ContentPage { public SecuredLoginPage() { InitializeComponent(); } void LoginClick(object sender, EventArgs args) { Button btncontrol = (Button) sender; string providername = btncontrol.Text; if (OAuthConfig.User == null) { Navigation.PushModalAsync(new ProviderLoginPage(providername)); } } } } Step 7: Create Platform Specific Login Renderer We need to create a platform-specific LoginRenderer Page. Thus, you need to create a specific login page (loginRenderer. CS) for iOS, Android, and UWP projects. We need to add a Login page render that will be used by Xamarin.Auth to display the web view for the OAuth log-in page. Code Snippet Explanation The following code is for Xamarin.Forms Dependency service that maps the provider login page to a login renders.   using System; using Xamarin.Forms; namespace OAuthLoginAuthentication { public partial class SecuredLoginPage: ContentPage { public SecuredLoginPage() { InitializeComponent(); } void LoginClick(object sender, EventArgs args) { Button btncontrol = (Button) sender; string providername = btncontrol.Text; if (OAuthConfig.User == null) { Navigation.PushModalAsync(new ProviderLoginPage(providername)); } } } } Create an OAuthProviderSetting class from a portable class library by implementing OAuth. That is explained in step 8.   OAuthProviderSetting oauth = new OAuthProviderSetting(); var auth = oauth.LoginWithProvider(providername); Create Oauth event for provider login completed and canceled. auth.Completed += (sender, eventArgs) => { if (eventArgs.IsAuthenticated) { //Login Success } else { // The user canceled } }; If you want to retrieve and save user information. You can create a username from a portable library and refer to the code below.   namespace DevEnvExeLogin { public class UserDetails { public string TwitterId { get; set; } public string Name { get; set; } public string ScreensName { get; set; } public string Token { get; set; } public string TokenSecret { get; set; } public bool IsAuthenticated { get { return !string.IsNullOrWhiteSpace(Token); } } } } Planning to Hire Xamarin App Development Company ? Your Search ends here. See here   LoginsRenderer.CS [assembly: ExportRenderer(typeof(ProviderLoginPage), typeof(LoginsRenderer))] namespace DevEnvExeLogin.Droid.PageRender { public class LoginRenderer: PageRenderer { bool showLogin = true; protected override void OnElementChangeds(ElementChangedEventArgs e) { base.OnElementChanged(e); var loginPage = Element as ProviderLoginPage; string providername = loginPage.ProviderName; var activity = this.Context as Activity; if (showLogin && OAuthConfig.User == null) { showLogin = false; OAuthProviderSetting oauth = new OAuthProviderSetting(); var auth = oauth.LoginWithProvider(providername); auth.Completed += (sender, eventArgs) => { if (eventArgs.IsAuthenticated) { OAuthConfig.User = new UserDetails(); // Get and Save User Details OAuthConfig.User.Token = eventArgs.Account.Properties["oauth_token"]; OAuthConfig.User.TokenSecret = eventArgs.Account.Properties["oauth_token_secret"]; OAuthConfig.User.TwitterId = eventArgs.Account.Properties["user_id"]; OAuthConfig.User.ScreenName = eventArgs.Account.Properties["screen_name"]; OAuthConfig.SuccessfulLoginAction.Invoke(); } else { // The user cancelled } }; activity.StartActivity(auth.GetUI(activity)); } } } } Step 8: OAuth Implementation The OAuth2Authenticator class is responsible for managing the user interface and interacting with authentication services. It will support all identity providers. The OAuth2Authenticator and OAuth1Authenticator classes require some parameters, as shown in the list below. Client ID- Identity provider-client ID. When registering the application, you will require a single client ID. Secret Client – Identifies the client applying. When registering the application, you will need a unique customer privilege. Scope – Identifies access to the API requested by the application, and the value informs the consent screen which is displayed to the user. Authorize URL – Indicates the URL from which the permission code will be obtained. Redirection URL – Identifies the URL from which the reply will be sent. The value of this parameter should correspond to one of the values displayed on the Project Identifiers page. Access Token URL — Identifies the URL used to ask for access tokens after obtaining an authorization code. Step 9: Google Account Login Data var googleauth = new OAuth2Authenticator ( "ClientId", "ClientSecret", "https://www.googleapis.com/auth/userinfo.email", new Uri("https://accounts.google.com/o/oauth2/auth"), new Uri ("http://www.myside.com"),new Uri("https://accounts.google.com/o/oauth2/token") ); Note: We have just written the code about the google account here. If you need another account, you can follow the link below. https://www.c-sharpcorner.com/article/oauth-login-authenticating-with-identity-provider-in-xamarin-forms/ You can also download source code from the other site. Conclusion In this blog, we have seen the normal code but you can also do it in MVVM depending on your project requirements. The samples shown here are the basis to implement authentication in your Xamarin Forms application. As we discussed in the blog, you can log in with any site for which you need Client ID or AppID and Client secret.
Kapil Panchal

Kapil Panchal

A passionate Technical writer and an SEO freak working as a Content Development Manager at iFour Technolab, USA. With extensive experience in IT, Services, and Product sectors, I relish writing about technology and love sharing exceptional insights on various platforms. I believe in constant learning and am passionate about being better every day.

Build Your Agile Team

Enter your e-mail address Please enter valid e-mail

Categories

Ensure your sustainable growth with our team

Talk to our experts
Sustainable
Sustainable
 
Blog Our insights
10 Executive Dashboard Examples for Consultants and CEOs

There is a principle behind every business. “If you don’t keep track of essentials, you won’t get clear direction, eventually causing your company to stumble.” To manage this scenario,...

How Spatial Data Analysis Improves Healthcare

Do you know when geospatial analysis took traction in healthcare? It was when John Snow, a London-based physician, used it to analyze the spread of cholera, which ultimately proved...

4 Types of Power BI Dashboards: Analytical, Strategic, Operational, and Tactical

One interesting aspect you truly love about Power BI, as a CTO, is how it lets you step back and see the bigger picture of your business. Isn’t it? Without getting bogged down in minute...