The WPF tree view supports data binding, as all other WPF controls do, but, as the tree view hierarchy does, a normal DataTemplate is often not enough. Instead, we use the Hierarchical Data template, which allows us to template both tree nodes while controlling which property to use as a source for the node's child objects. The tree view tag represents the WPF TreeView control in XAML.
The tree view tag represents the WPF TreeView control in XAML.
A tree view represents data in a hierarchical view of the parent-child relationship where the parent node may expand or collapse. The left sidebar of Windows Explorer is an example of a tree view.
Creating a TreeView
TreeView control contains a hierarchy of TreeViewItem controls. A TreeViewItem control is a HeaderedItemsControl that contains a collection of headers and items. HeaderedItemsControl
If you are defining a tree view using the Extensible Application Markup Language (XAML), you can specify the header content of a TreeViewItem control and the items created from its collection. The previous illustration illustrates this method.
You can also specify the item source as the data source and then specify a HeaderTemplate and ItemTemplate to define the TreeViewItem content.
You can also use HierarchicalDataTemplate objects to define the layout of a TreeViewItem control. For more information and example use SelectedValue, SelectedValuePath, and SelectedItem.
A Hard-Coded WPF Tree View
To get started, let's look at a typical two-tier WPF tree view that is strictly coded with the values shown in the code snippet below.
Output:
In this example, we saw how to create a normal TreeView with the help of the XAML file and in the output, we saw that we created two headers and added TreeItem to it. We did all this in the XAML file which is a static method.
Dynamic TreeView
Now we have learned to dynamically create a TreeView.
There are many templates for creating WPF tree view control and constructing it in XAML but in actual use, we are more likely to dynamically create tree view control from data. It must be in code like C#, not XAML.
Let's start with XAML:
There is a member in the Tree View class, "Items", which is an item collection. Item Collection for TreeView is a collection of Treeitems. Review item objects also have an "Items" member which is an item collection. It often forms a hierarchical structure.
We need to add at least one TreeViewItem to the object of the TreeView class. That will be the root node(s) of the TreeView. Typically, the root has a single node but multiple root nodes are possible. We then add the TreeViewItem add objects to the corresponding items in the TreeViewItem objects. The following code will make a simple tree:
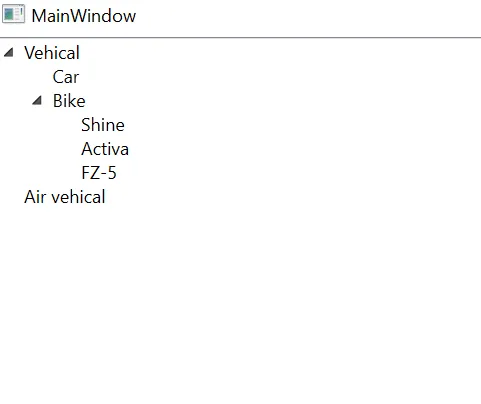
TreeViewItem HeaderPart = new TreeViewItem(); HeaderPart.Header = "Vehical"; DynamicTree.Items.Add(HeaderPart); // TreeViewItem Treeitems = new TreeViewItem(); Treeitems.Header = "Car"; HeaderPart.Items.Add(Treeitems); // TreeViewItem Treeitemsone = new TreeViewItem(); Treeitemsone.Header = "Bike"; HeaderPart.Items.Add(Treeitemsone); TreeViewItem SubTreeitems = new TreeViewItem(); SubTreeitems.Header = "Shine"; Treeitemsone.Items.Add(SubTreeitems); TreeViewItem SubTreeitemsone = new TreeViewItem(); SubTreeitemsone.Header = "Activa"; Treeitemsone.Items.Add(SubTreeitemsone); TreeViewItem SubTreeitemsTwo = new TreeViewItem(); SubTreeitemsTwo.Header = "FZ-5"; Treeitemsone.Items.Add(SubTreeitemsTwo); // TreeViewItem HeaderPartOne = new TreeViewItem(); HeaderPartOne.Header = "Air vehical"; DynamicTree.Items.Add(HeaderPartOne);
The following is a tree created by the previous code:
Data binding and multiple templates
WPF supports TreeView data binding, as do all other WPF controls, but, as TreeView hierarchy does a normal Datatemplate is often not enough. Instead, we use the Hierarchical Data template, which allows us to template both tree nodes while controlling which property to use as a source for the node's child objects.
A basic data-bound TreeView
In the following example, We will show you how easy it is to get started with a hierarchical data template:
.XAML file>
.CS File
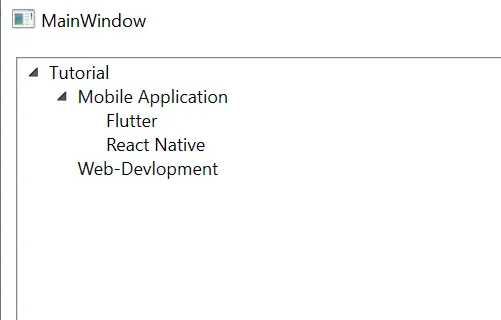
public MainWindow() { InitializeComponent(); MenuItem Head = new MenuItem() { Title = "Tutorial" }; MenuItem subdItem1 = new MenuItem() { Title = "Mobile Application" }; subdItem1.Items.Add(new MenuItem() { Title = "Flutter" }); subdItem1.Items.Add(new MenuItem() { Title = "React Native" }); Head.Items.Add(subdItem1); Head.Items.Add(new MenuItem() { Title = "Web-Devlopment" }); treehirmenu.Items.Add(Head); } public class MenuItem { public MenuItem() { this.Items = new ObservableCollection
The following is a tree created by the previous code:
In the XAML markup, we mentioned the hierarchical data template for the TreeView item template. We instruct him to use the Items property to find the child's items by setting the template's Itemsource property, and within that, we define the actual template, which now consists only of a text block bound to the title property.
This first example was very simple, in fact so simple that we just added tree view objects manually, instead of generating a bunch of objects and then binding them. However, as things get a little more complicated, the benefits of using data bindings immediately become more apparent.
Wants to Talk with Our Highly Skilled WPF Developer ? Contact Now
Multiple templates for different types
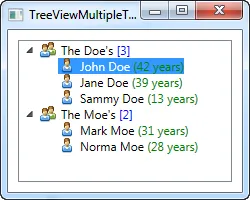
In the next example, we have taken a slightly more complex case, where we want to show the tree of families and their members. The family should be represented in one way, while each of its members should be shown in another way. We achieved this by creating two different templates and specifying them as the source of the tree (or window or application - which is really up to you) and then, allowing the tree view to select the appropriate template based on the type of data underlying it.
.Xaml file
.cs File
public MainWindow() { InitializeComponent(); Listfamilies = new List (); MyFamily familyone = new MyFamily() { Name = "The Doe's" }; familyone.Members.Add(new FamilyMember() { Name = "John Doe", Age = 42 }); familyone.Members.Add(new FamilyMember() { Name = "Jane Doe", Age = 39 }); familyone.Members.Add(new FamilyMember() { Name = "Sammy Doe", Age = 13 }); families.Add(familyone); MyFamily familyTwo = new MyFamily() { Name = "The Moe's" }; familyTwo.Members.Add(new FamilyMember() { Name = "Mark Moe", Age = 31 }); familyTwo.Members.Add(new FamilyMember() { Name = "Norma Moe", Age = 28 }); familyTwo.Add(familyTwo); manyFamilies.ItemsSource = families; } public class MyFamily { public MyFamily() { this.Members = new ObservableCollection (); } public string Name { get; set; } public ObservableCollection Members { get; set; } } public class FamilyMember { public string Name { get; set; } public int Age { get; set; } }
Output
Reference: https://www.wpf-tutorial.com
As mentioned, two templates have been revealed as part of TreeView resources, allowing TreeView to select the appropriate template based on the type of data to be displayed. A specified sample for a MyFamily type is a hierarchical sample, in which the property of the members is used to show its MyFamily members.
The template defined for the MyFamily Member type is a regular data template, as there are no child members in this type. However, if we wanted each family member to have a collection of their children and possibly their children, we could use a hierarchical template instead.
In both samples, we used an image representing a family or family members, and then we show some interesting data about it, such as the number of family members or the age of the person.
In Code-Bank, we simply create two family patterns, fill each of them with a set of members, and then add each of the family to the list, which is then used as a source of items for the tree view.
Conclusion
While it is entirely possible to define a complete tree view using mark-up as we did in the examples above, this is not the best approach in most situations, and when you could code it later, this would have resulted in even more Code lines. Once again, the solution is data binding. Using data binding, the tree view is highly customizable and with the ability to specify multiple templates to represent different data types, the possibilities are almost endless.
What is Treeview in WPF? The WPF tree view supports data binding, as all other WPF controls do, but, as the tree view hierarchy does, a normal DataTemplate is often not enough. Instead, we use the Hierarchical Data template, which allows us to template both tree nodes while controlling which property to use as a source for the node's child objects. The tree view tag represents the WPF TreeView control in XAML. The tree view tag represents the WPF TreeView control in XAML. A tree view represents data in a hierarchical view of the parent-child relationship where the parent node may expand or collapse. The left sidebar of Windows Explorer is an example of a tree view. Creating a TreeView TreeView control contains a hierarchy of TreeViewItem controls. A TreeViewItem control is a HeaderedItemsControl that contains a collection of headers and items. HeaderedItemsControl If you are defining a tree view using the Extensible Application Markup Language (XAML), you can specify the header content of a TreeViewItem control and the items created from its collection. The previous illustration illustrates this method. You can also specify the item source as the data source and then specify a HeaderTemplate and ItemTemplate to define the TreeViewItem content. You can also use HierarchicalDataTemplate objects to define the layout of a TreeViewItem control. For more information and example use SelectedValue, SelectedValuePath, and SelectedItem. A Hard-Coded WPF Tree View To get started, let's look at a typical two-tier WPF tree view that is strictly coded with the values shown in the code snippet below. Output: Screenshot_1: TreeView Output In this example, we saw how to create a normal TreeView with the help of the XAML file and in the output, we saw that we created two headers and added TreeItem to it. We did all this in the XAML file which is a static method. Dynamic TreeView Now we have learned to dynamically create a TreeView. There are many templates for creating WPF tree view control and constructing it in XAML but in actual use, we are more likely to dynamically create tree view control from data. It must be in code like C#, not XAML. Read More: What Are Fallback And Target Null Values In Wpf? Let's start with XAML: There is a member in the Tree View class, "Items", which is an item collection. Item Collection for TreeView is a collection of Treeitems. Review item objects also have an "Items" member which is an item collection. It often forms a hierarchical structure. We need to add at least one TreeViewItem to the object of the TreeView class. That will be the root node(s) of the TreeView. Typically, the root has a single node but multiple root nodes are possible. We then add the TreeViewItem add objects to the corresponding items in the TreeViewItem objects. The following code will make a simple tree: TreeViewItem HeaderPart = new TreeViewItem(); HeaderPart.Header = "Vehical"; DynamicTree.Items.Add(HeaderPart); // TreeViewItem Treeitems = new TreeViewItem(); Treeitems.Header = "Car"; HeaderPart.Items.Add(Treeitems); // TreeViewItem Treeitemsone = new TreeViewItem(); Treeitemsone.Header = "Bike"; HeaderPart.Items.Add(Treeitemsone); TreeViewItem SubTreeitems = new TreeViewItem(); SubTreeitems.Header = "Shine"; Treeitemsone.Items.Add(SubTreeitems); TreeViewItem SubTreeitemsone = new TreeViewItem(); SubTreeitemsone.Header = "Activa"; Treeitemsone.Items.Add(SubTreeitemsone); TreeViewItem SubTreeitemsTwo = new TreeViewItem(); SubTreeitemsTwo.Header = "FZ-5"; Treeitemsone.Items.Add(SubTreeitemsTwo); // TreeViewItem HeaderPartOne = new TreeViewItem(); HeaderPartOne.Header = "Air vehical"; DynamicTree.Items.Add(HeaderPartOne); The following is a tree created by the previous code: Screenshot_2: Dynamic TreeView Data binding and multiple templates WPF supports TreeView data binding, as do all other WPF controls, but, as TreeView hierarchy does a normal Datatemplate is often not enough. Instead, we use the Hierarchical Data template, which allows us to template both tree nodes while controlling which property to use as a source for the node's child objects. A basic data-bound TreeView In the following example, We will show you how easy it is to get started with a hierarchical data template: .XAML file> .CS File public MainWindow() { InitializeComponent(); MenuItem Head = new MenuItem() { Title = "Tutorial" }; MenuItem subdItem1 = new MenuItem() { Title = "Mobile Application" }; subdItem1.Items.Add(new MenuItem() { Title = "Flutter" }); subdItem1.Items.Add(new MenuItem() { Title = "React Native" }); Head.Items.Add(subdItem1); Head.Items.Add(new MenuItem() { Title = "Web-Devlopment" }); treehirmenu.Items.Add(Head); } public class MenuItem { public MenuItem() { this.Items = new ObservableCollection(); } public string Title { get; set; } public ObservableCollection Items { get; set; } } The following is a tree created by the previous code: Screenshot_3: DataBinding TreeView In the XAML markup, we mentioned the hierarchical data template for the TreeView item template. We instruct him to use the Items property to find the child's items by setting the template's Itemsource property, and within that, we define the actual template, which now consists only of a text block bound to the title property. This first example was very simple, in fact so simple that we just added tree view objects manually, instead of generating a bunch of objects and then binding them. However, as things get a little more complicated, the benefits of using data bindings immediately become more apparent. Wants to Talk with Our Highly Skilled WPF Developer ? Contact Now See here Multiple templates for different types In the next example, we have taken a slightly more complex case, where we want to show the tree of families and their members. The family should be represented in one way, while each of its members should be shown in another way. We achieved this by creating two different templates and specifying them as the source of the tree (or window or application - which is really up to you) and then, allowing the tree view to select the appropriate template based on the type of data underlying it. .Xaml file .cs File public MainWindow() { InitializeComponent(); List families = new List(); MyFamily familyone = new MyFamily() { Name = "The Doe's" }; familyone.Members.Add(new FamilyMember() { Name = "John Doe", Age = 42 }); familyone.Members.Add(new FamilyMember() { Name = "Jane Doe", Age = 39 }); familyone.Members.Add(new FamilyMember() { Name = "Sammy Doe", Age = 13 }); families.Add(familyone); MyFamily familyTwo = new MyFamily() { Name = "The Moe's" }; familyTwo.Members.Add(new FamilyMember() { Name = "Mark Moe", Age = 31 }); familyTwo.Members.Add(new FamilyMember() { Name = "Norma Moe", Age = 28 }); familyTwo.Add(familyTwo); manyFamilies.ItemsSource = families; } public class MyFamily { public MyFamily() { this.Members = new ObservableCollection(); } public string Name { get; set; } public ObservableCollection Members { get; set; } } public class FamilyMember { public string Name { get; set; } public int Age { get; set; } } Output Reference: https://www.wpf-tutorial.com As mentioned, two templates have been revealed as part of TreeView resources, allowing TreeView to select the appropriate template based on the type of data to be displayed. A specified sample for a MyFamily type is a hierarchical sample, in which the property of the members is used to show its MyFamily members. The template defined for the MyFamily Member type is a regular data template, as there are no child members in this type. However, if we wanted each family member to have a collection of their children and possibly their children, we could use a hierarchical template instead. In both samples, we used an image representing a family or family members, and then we show some interesting data about it, such as the number of family members or the age of the person. In Code-Bank, we simply create two family patterns, fill each of them with a set of members, and then add each of the family to the list, which is then used as a source of items for the tree view. Conclusion While it is entirely possible to define a complete tree view using mark-up as we did in the examples above, this is not the best approach in most situations, and when you could code it later, this would have resulted in even more Code lines. Once again, the solution is data binding. Using data binding, the tree view is highly customizable and with the ability to specify multiple templates to represent different data types, the possibilities are almost endless.
Build Your Agile Team