×

iFour Logo

Explain Model Validation Using Data Annotation in ASP.NET MVC

Kapil Panchal - July 27, 2021

Listening is fun too.

Straighten your back and cherish with coffee - PLAY !

  • play
  • pause
  • pause
Explain Model Validation Using Data Annotation in ASP.NET MVC

What is Data Validation?


Data Validation is an important aspect of developing web applications. It is used to check whether the user data entered is valid or not. To work on this, ASP.NET MVC offers Data Annotation attribute classes to modal class.

What are Data Annotations?


Data annotations are nothing but certain validations that are used with models to validate the user input from users. Data Annotation attribute classes are present in System.ComponentModel.DataAnnotations namespace is a powerful way to check for errors and, if necessary, display messages to the user.

Types of Data Annotations in ASP.NET MVC


Require

This type of attribute specifies that the value cannot be skipped, user needs to enter the value for this field.

Syntax

[Required(ErrorMessage=Message),MaxLength(int)]

Here MaxLength is option parameter

Example

[Required(ErrorMessage = Name is Required ), MaxLength(20)]

[Required(ErrorMessage = "Email ID is Required")]

DataType

This type of attribute specifies that the value cannot be skipped, user needs to enter the value for this field.

Syntax

[DataType(DataType.Text)]

Example

[DataType(DataType.Currency)]

[DataType(DataType.Date)]

StringLength

This type of attribute is used to specify the size of the column.

The StringLength attribute specifies the minimum and maximum length of the property.StringLength similar to a minimum and maximum length attributes but used only with string type properties.

Syntax

[StringLength(MaximumLength, MinimumLength = value)]

[StringLength(MaximumLength, MinimumLength =value, ErrorMessage = "Message”)]

Example

[StringLength(50, MinimumLength = 10)]

[StringLength(50, MinimumLength = 10, ErrorMessage = Do not enter more than 50 character and less than 10 character)]

Range

Using this attribute, we can specify the minimum and maximum value for a numeric value.

Syntax

[Range(minimum,maximum,ErrorMessage=Message)]

Example

[Range(18,60,ErrorMessage=Age must between 18 to 60 )]

DisplayName

This type of attribute allows us to specify the property name displayed on the view.

Syntax

[Display(Name=Name Display on View)]

Example

[Display(Name=First Name)]

DisplayFormat

This attribute allows us to set the format specified as per the attribute.

Syntax

[DisplayFormat(DataFormatString = specify format )]

Example

[DisplayFormat(DataFormatString = {0:dd.MM.yyyy})]

MaxLength

Using this attribute, we can specify the maximum length of the property.

Syntax

[MaxLength(value)]

Example

[MaxLength(50,ErrorMessage="Description cannot be greater than 50")]

MinLength

This type of attribute is used to specify the minimum length of string or an array property

Syntax

[MinLength(value)]

Example

[MinLength(20)]

[MinLength(20,ErrorMessage=Description cannot be less than 50)]

Bind

This type of attribute specifies fields to include and exclude properties for model binding.

Example

[Bind(Exclude = UserId)]

[Bind(Include = UserId,Name,Email,Gender)]

RegularExpression

We can set a pattern for the property for Ex we can set RegularExperssion for Email String

Example

[RegularExpression(@^\w+([-+.']\w+)*@\w+([-.]\w+)*\.\w+([-.]\w+)*$, ErrorMessage = Enter Valid Email)]

Create MVC Application for Data Annotation Demo


Now, we need to create an MVC application for the data annotation demo. Create a new MVC application and inside the model, folder add a new class for model.

Right, click on model, click on add, and select class.
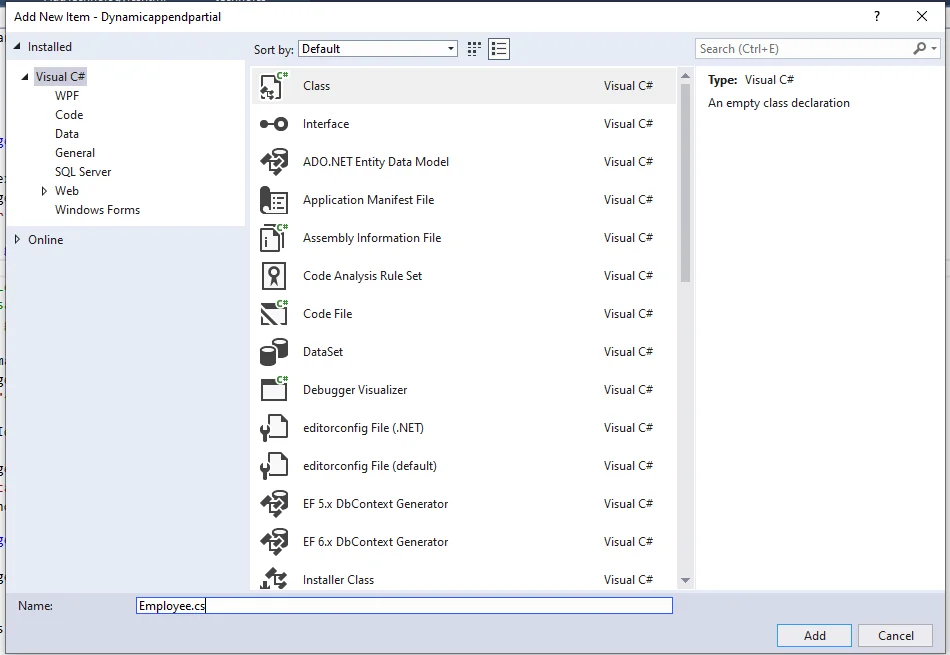
 

classformodel


[Fig:- class for model]

Employee class
            
using System;
using System.ComponentModel.DataAnnotations;

namespace Dynamicappendpartial.Models
{
    public class Employee
    {
        public int E_Id { get; set; }
		
        [Required(ErrorMessage = "name  Required")]
        [Display(Name = "Full Name")]
        [MaxLength(30), MinLength(10)]
        public string Name { get; set; }
		
        [Required(ErrorMessage = "gender Required")]
        public string Gender { get; set; }
		
        [Required(ErrorMessage = "Email Address Required")]
        [Display(Name = "Email Address")]
        [EmailAddress]
        public string EmailAddress { get; set; }
		
        [Required(ErrorMessage = "Postion Required")]
        public string Position { get; set; }
		
        [Required(ErrorMessage = "Hire Date Required")]
        [Display(Name = "Hire date")]
        [DisplayFormat(DataFormatString = "{0:dd.MM.yyyy}")]
        public DateTime HireDate { get; set; }
		
        [Required(ErrorMessage = "salary Required")]
        [DataType(DataType.Currency)]
        [Range(15000, 60000, ErrorMessage = "salary must between 15000 to 60000")]
        public int Salary { get; set; }
		
        [Required(ErrorMessage = "Website Required")]
        [Display(Name = "Personal Website")]
        [Url]
        public string WebSite { get; set; }
    }
}

Add controller inside the controller folder.

EmployeeController
            
using System;
using System.Collections.Generic;
using System.Data;
using System.Data.Entity;
using System.Linq;
using System.Net;
using System.Web;
using System.Web.Mvc;
using Dynamicappendpartial.Models;

namespace Dynamicappendpartial.Controllers
{
    public class EmployeesController: Controller
    {
        private PartialDbContext db = new PartialDbContext();
		
        public ActionResult Index()
        {
            return View(db.Employees.ToList());
        }
		
        public ActionResult Details(int? id)
        {
            if (id == null)
            {
                return new HttpStatusCodeResult(HttpStatusCode.BadRequest);
            }
            Employee employee = db.Employees.Find(id);
            if (employee == null)
            {
                return HttpNotFound();
            }
            return View(employee);
        }
		
        public ActionResult Create()
        {
            return View();
        }
		
        [HttpPost]
        [ValidateAntiForgeryToken]
        public ActionResult Create([Bind(Include = "Id,Name,Gender,EmailAddress,Position,HireDate,Salary,WebSite")] Employee employee)
        {
            if (ModelState.IsValid)
            {
                db.Employees.Add(employee);
                db.SaveChanges();
                return RedirectToAction("Index");
            }
			
            return View(employee);
        }
        public ActionResult Delete(int? id)
        {
            if (id == null)
            {
                return new HttpStatusCodeResult(HttpStatusCode.BadRequest);
            }
            Employee employee = db.Employees.Find(id);
            if (employee == null)
            {
                return HttpNotFound();
            }
            return View(employee);
        }
		
        [HttpPost, ActionName("Delete")]
        [ValidateAntiForgeryToken]
        public ActionResult DeleteConfirmed(int id)
        {
            Employee employee = db.Employees.Find(id);
            db.Employees.Remove(employee);
            db.SaveChanges();
            return RedirectToAction("Index");
        }
    }
}

Right-click on Create method and add the view for create method.


Create view
        @model Dynamicappendpartial.Models.Employee
			  
@{
    ViewBag.Title = "Create";
}

Create

@using (Html.BeginForm()) { @Html.AntiForgeryToken()

Employee


@Html.ValidationSummary(true, "", new { @class = "text-danger" })
@Html.LabelFor(model => model.Name, htmlAttributes: new { @class = "control-label col-md-2" })
@Html.EditorFor(model => model.Name, new { htmlAttributes = new { @class = "form-control" } }) @Html.ValidationMessageFor(model => model.Name, "", new { @class = "text-danger" })
@Html.LabelFor(model => model.Gender, htmlAttributes: new { @class = "control-label col-md-2" })
@Html.EditorFor(model => model.Gender, new { htmlAttributes = new { @class = "form-control" } }) @Html.ValidationMessageFor(model => model.Gender, "", new { @class = "text-danger" })
@Html.LabelFor(model => model.EmailAddress, htmlAttributes: new { @class = "control-label col-md-2" })
@Html.EditorFor(model => model.EmailAddress, new { htmlAttributes = new { @class = "form-control" } }) @Html.ValidationMessageFor(model => model.EmailAddress, "", new { @class = "text-danger" })
@Html.LabelFor(model => model.Position, htmlAttributes: new { @class = "control-label col-md-2" })
@Html.EditorFor(model => model.Position, new { htmlAttributes = new { @class = "form-control" } }) @Html.ValidationMessageFor(model => model.Position, "", new { @class = "text-danger" })
@Html.LabelFor(model => model.HireDate, htmlAttributes: new { @class = "control-label col-md-2" })
@Html.EditorFor(model => model.HireDate, new { htmlAttributes = new { @class = "form-control" } }) @Html.ValidationMessageFor(model => model.HireDate, "", new { @class = "text-danger" })
@Html.LabelFor(model => model.Salary, htmlAttributes: new { @class = "control-label col-md-2" })
@Html.EditorFor(model => model.Salary, new { htmlAttributes = new { @class = "form-control" } }) @Html.ValidationMessageFor(model => model.Salary, "", new { @class = "text-danger" })
@Html.LabelFor(model => model.WebSite, htmlAttributes: new { @class = "control-label col-md-2" })
@Html.EditorFor(model => model.WebSite, new { htmlAttributes = new { @class = "form-control" } }) @Html.ValidationMessageFor(model => model.WebSite, "", new { @class = "text-danger" })
}
@Html.ActionLink("Back to List", "Index")

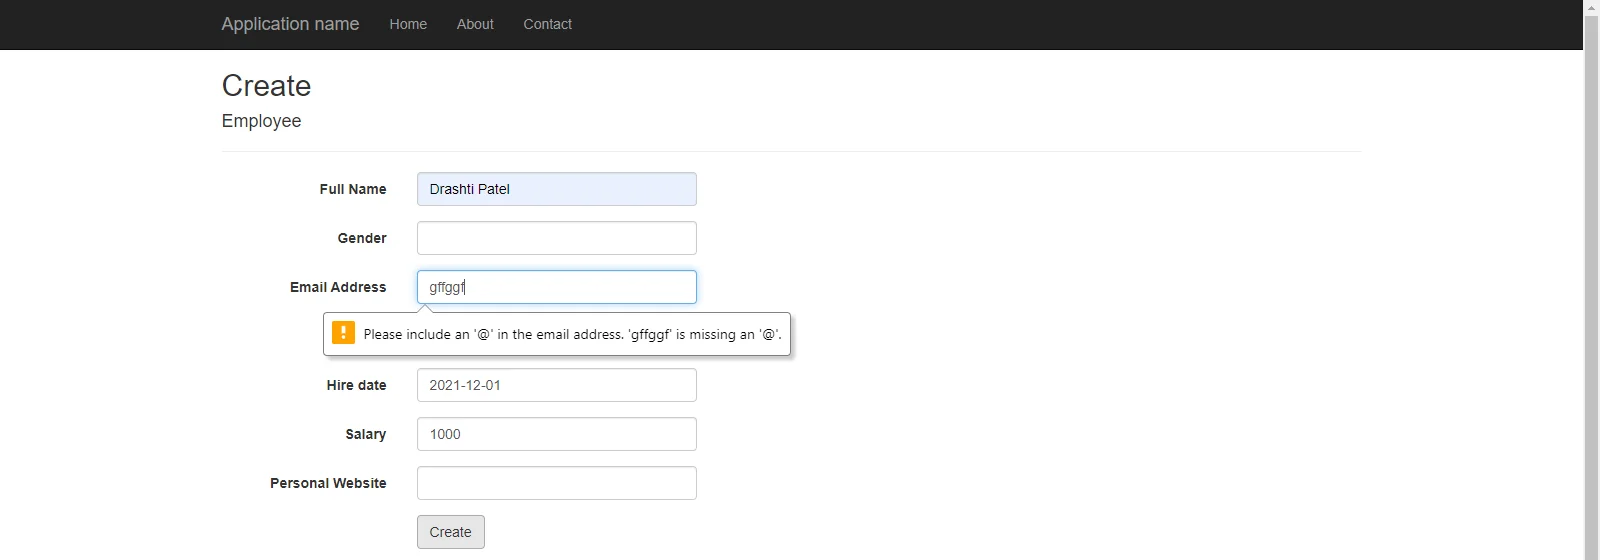
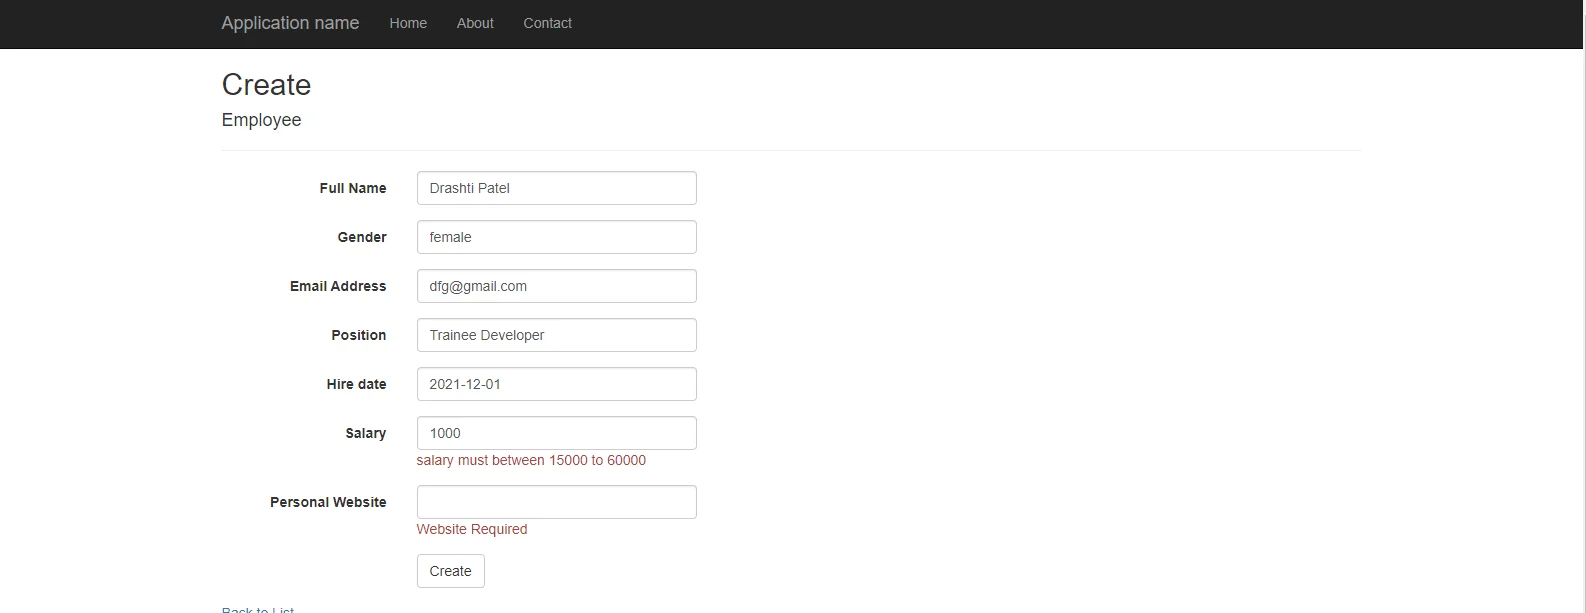
Now, run the application and click on create and add details and check the model validation
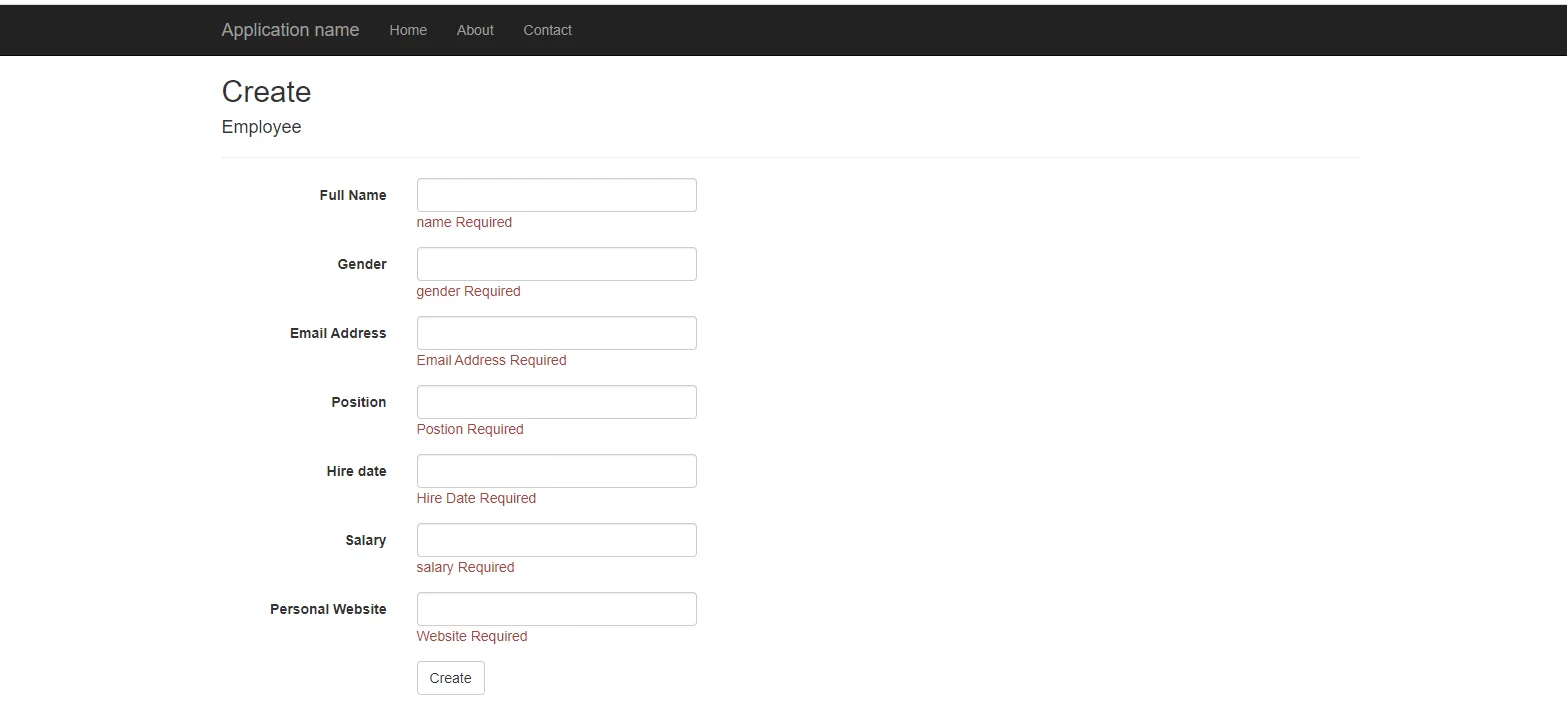
 

modelvalidationforemptyfield


[Fig:- model validation for empty field]

ModelvalidationforEmail

[Fig:- Model validation for Email]

Modelvalidationforasalary

[Fig:- Model validation for a salary]

Conclusion

In this blog, we have learned Data Annotations. It provides a list of attributes for model validation. Using different types of attributes, we create restrictions to a user if he enters data that is of invalid format or Invalid range.

Explain Model Validation Using Data Annotation in ASP.NET MVC Table of Content 1.What is Data Validation? 2.What are Data Annotations? 3.Types of Data Annotations in ASP.NET MVC 3.1.Require 3.2.DataType 3.3.StringLength 3.4.Range 3.5.DisplayName 3.6.DisplayFormat 3.7.MaxLength 3.8.MinLength 3.9.Bind 3.10.RegularExpression 4.Create MVC Application for Data Annotation Demo 5.Conclusion What is Data Validation? Data Validation is an important aspect of developing web applications. It is used to check whether the user data entered is valid or not. To work on this, ASP.NET MVC offers Data Annotation attribute classes to modal class. What are Data Annotations? Data annotations are nothing but certain validations that are used with models to validate the user input from users. Data Annotation attribute classes are present in System.ComponentModel.DataAnnotations namespace is a powerful way to check for errors and, if necessary, display messages to the user. Types of Data Annotations in ASP.NET MVC Require This type of attribute specifies that the value cannot be skipped, user needs to enter the value for this field. Syntax [Required(ErrorMessage=Message),MaxLength(int)] Here MaxLength is option parameter Example [Required(ErrorMessage = Name is Required ), MaxLength(20)] [Required(ErrorMessage = "Email ID is Required")] DataType This type of attribute specifies that the value cannot be skipped, user needs to enter the value for this field. Syntax [DataType(DataType.Text)] Example [DataType(DataType.Currency)] [DataType(DataType.Date)] StringLength This type of attribute is used to specify the size of the column. The StringLength attribute specifies the minimum and maximum length of the property.StringLength similar to a minimum and maximum length attributes but used only with string type properties. Syntax [StringLength(MaximumLength, MinimumLength = value)] [StringLength(MaximumLength, MinimumLength =value, ErrorMessage = "Message”)] Example [StringLength(50, MinimumLength = 10)] [StringLength(50, MinimumLength = 10, ErrorMessage = Do not enter more than 50 character and less than 10 character)] Range Using this attribute, we can specify the minimum and maximum value for a numeric value. Syntax [Range(minimum,maximum,ErrorMessage=Message)] Example [Range(18,60,ErrorMessage=Age must between 18 to 60 )] DisplayName This type of attribute allows us to specify the property name displayed on the view. Syntax [Display(Name=Name Display on View)] Example [Display(Name=First Name)] DisplayFormat This attribute allows us to set the format specified as per the attribute. Syntax [DisplayFormat(DataFormatString = specify format )] Example [DisplayFormat(DataFormatString = {0:dd.MM.yyyy})] MaxLength Using this attribute, we can specify the maximum length of the property. Syntax [MaxLength(value)] Example [MaxLength(50,ErrorMessage="Description cannot be greater than 50")] MinLength This type of attribute is used to specify the minimum length of string or an array property Syntax [MinLength(value)] Example [MinLength(20)] [MinLength(20,ErrorMessage=Description cannot be less than 50)] Bind This type of attribute specifies fields to include and exclude properties for model binding. Example [Bind(Exclude = UserId)] [Bind(Include = UserId,Name,Email,Gender)] Read More: Explain Forms Authentication In Asp.net Mvc RegularExpression We can set a pattern for the property for Ex we can set RegularExperssion for Email String Example [RegularExpression(@^\w+([-+.']\w+)*@\w+([-.]\w+)*\.\w+([-.]\w+)*$, ErrorMessage = Enter Valid Email)] Create MVC Application for Data Annotation Demo Now, we need to create an MVC application for the data annotation demo. Create a new MVC application and inside the model, folder add a new class for model. Right, click on model, click on add, and select class.     [Fig:- class for model] Employee class using System; using System.ComponentModel.DataAnnotations; namespace Dynamicappendpartial.Models { public class Employee { public int E_Id { get; set; } [Required(ErrorMessage = "name Required")] [Display(Name = "Full Name")] [MaxLength(30), MinLength(10)] public string Name { get; set; } [Required(ErrorMessage = "gender Required")] public string Gender { get; set; } [Required(ErrorMessage = "Email Address Required")] [Display(Name = "Email Address")] [EmailAddress] public string EmailAddress { get; set; } [Required(ErrorMessage = "Postion Required")] public string Position { get; set; } [Required(ErrorMessage = "Hire Date Required")] [Display(Name = "Hire date")] [DisplayFormat(DataFormatString = "{0:dd.MM.yyyy}")] public DateTime HireDate { get; set; } [Required(ErrorMessage = "salary Required")] [DataType(DataType.Currency)] [Range(15000, 60000, ErrorMessage = "salary must between 15000 to 60000")] public int Salary { get; set; } [Required(ErrorMessage = "Website Required")] [Display(Name = "Personal Website")] [Url] public string WebSite { get; set; } } } Add controller inside the controller folder. EmployeeController using System; using System.Collections.Generic; using System.Data; using System.Data.Entity; using System.Linq; using System.Net; using System.Web; using System.Web.Mvc; using Dynamicappendpartial.Models; namespace Dynamicappendpartial.Controllers { public class EmployeesController: Controller { private PartialDbContext db = new PartialDbContext(); public ActionResult Index() { return View(db.Employees.ToList()); } public ActionResult Details(int? id) { if (id == null) { return new HttpStatusCodeResult(HttpStatusCode.BadRequest); } Employee employee = db.Employees.Find(id); if (employee == null) { return HttpNotFound(); } return View(employee); } public ActionResult Create() { return View(); } [HttpPost] [ValidateAntiForgeryToken] public ActionResult Create([Bind(Include = "Id,Name,Gender,EmailAddress,Position,HireDate,Salary,WebSite")] Employee employee) { if (ModelState.IsValid) { db.Employees.Add(employee); db.SaveChanges(); return RedirectToAction("Index"); } return View(employee); } public ActionResult Delete(int? id) { if (id == null) { return new HttpStatusCodeResult(HttpStatusCode.BadRequest); } Employee employee = db.Employees.Find(id); if (employee == null) { return HttpNotFound(); } return View(employee); } [HttpPost, ActionName("Delete")] [ValidateAntiForgeryToken] public ActionResult DeleteConfirmed(int id) { Employee employee = db.Employees.Find(id); db.Employees.Remove(employee); db.SaveChanges(); return RedirectToAction("Index"); } } } Right-click on Create method and add the view for create method. Looking for Trusted ASP.Net Software Development Company For Your Business? CONNECT US Create view @model Dynamicappendpartial.Models.Employee @{ ViewBag.Title = "Create"; }Create @using (Html.BeginForm()) { @Html.AntiForgeryToken() Employee @Html.ValidationSummary(true, "", new { @class = "text-danger" }) @Html.LabelFor(model => model.Name, htmlAttributes: new { @class = "control-label col-md-2" }) @Html.EditorFor(model => model.Name, new { htmlAttributes = new { @class = "form-control" } }) @Html.ValidationMessageFor(model => model.Name, "", new { @class = "text-danger" }) @Html.LabelFor(model => model.Gender, htmlAttributes: new { @class = "control-label col-md-2" }) @Html.EditorFor(model => model.Gender, new { htmlAttributes = new { @class = "form-control" } }) @Html.ValidationMessageFor(model => model.Gender, "", new { @class = "text-danger" }) @Html.LabelFor(model => model.EmailAddress, htmlAttributes: new { @class = "control-label col-md-2" }) @Html.EditorFor(model => model.EmailAddress, new { htmlAttributes = new { @class = "form-control" } }) @Html.ValidationMessageFor(model => model.EmailAddress, "", new { @class = "text-danger" }) @Html.LabelFor(model => model.Position, htmlAttributes: new { @class = "control-label col-md-2" }) @Html.EditorFor(model => model.Position, new { htmlAttributes = new { @class = "form-control" } }) @Html.ValidationMessageFor(model => model.Position, "", new { @class = "text-danger" }) @Html.LabelFor(model => model.HireDate, htmlAttributes: new { @class = "control-label col-md-2" }) @Html.EditorFor(model => model.HireDate, new { htmlAttributes = new { @class = "form-control" } }) @Html.ValidationMessageFor(model => model.HireDate, "", new { @class = "text-danger" }) @Html.LabelFor(model => model.Salary, htmlAttributes: new { @class = "control-label col-md-2" }) @Html.EditorFor(model => model.Salary, new { htmlAttributes = new { @class = "form-control" } }) @Html.ValidationMessageFor(model => model.Salary, "", new { @class = "text-danger" }) @Html.LabelFor(model => model.WebSite, htmlAttributes: new { @class = "control-label col-md-2" }) @Html.EditorFor(model => model.WebSite, new { htmlAttributes = new { @class = "form-control" } }) @Html.ValidationMessageFor(model => model.WebSite, "", new { @class = "text-danger" }) } @Html.ActionLink("Back to List", "Index") Now, run the application and click on create and add details and check the model validation     [Fig:- model validation for empty field] [Fig:- Model validation for Email] [Fig:- Model validation for a salary] Conclusion In this blog, we have learned Data Annotations. It provides a list of attributes for model validation. Using different types of attributes, we create restrictions to a user if he enters data that is of invalid format or Invalid range.
Kapil Panchal

Kapil Panchal

A passionate Technical writer and an SEO freak working as a Content Development Manager at iFour Technolab, USA. With extensive experience in IT, Services, and Product sectors, I relish writing about technology and love sharing exceptional insights on various platforms. I believe in constant learning and am passionate about being better every day.

Build Your Agile Team

Enter your e-mail address Please enter valid e-mail

Categories

Ensure your sustainable growth with our team

Talk to our experts
Sustainable
Sustainable
 
Blog Our insights
10 Executive Dashboard Examples for Consultants and CEOs

There is a principle behind every business. “If you don’t keep track of essentials, you won’t get clear direction, eventually causing your company to stumble.” To manage this scenario,...

How Spatial Data Analysis Improves Healthcare

Do you know when geospatial analysis took traction in healthcare? It was when John Snow, a London-based physician, used it to analyze the spread of cholera, which ultimately proved...

4 Types of Power BI Dashboards: Analytical, Strategic, Operational, and Tactical

One interesting aspect you truly love about Power BI, as a CTO, is how it lets you step back and see the bigger picture of your business. Isn’t it? Without getting bogged down in minute...