Top Business Intelligence Reporting Tools for CTOs
It’s difficult to believe, but there are about 426 Business Intelligence tools available! And the leaders in this field are Tableau, holding a 12.37% market share, and Power BI, which...
Kapil Panchal - November 20, 2020
Listening is fun too.
Straighten your back and cherish with coffee - PLAY !
There are a few ways to create and deploy angular apps like angular with NodeJS, angular with java, etc. Azure static web apps are one of them and it is released by Microsoft Azure.
Azure web services are cloud platform services that provide to develop applications across web, APIs, and function. Azure web services accelerate your web development with a frontend development and backend service powered by serverless APIs. It is considered as a Platform as a service [PaaS] and Infrastructure as a service [IaaS].
Creating and Deploying an angular application on the Azure web service with the following steps:
Step 1: Create an Azure Web Service
Step 2: Create an Angular Project
Step 3: Build the Angular Application
Step 4: Configure the web service and deploy it
The first thing to do is setup a new web app on the Azure cloud. The Azure CLI or the Azure portal can be used to create a new web app
To create a web app:
Step 1.1: Click on the Create a resource -> search web app -> Create
Step 1.2: Write your application a unique name, you can leave the rest of the field as default. The Application is going to be hosted in a Service plan.It has different plan for that. Once it will be created you can search for your application in the search bar or check your application in the App Service blade.
First of all, we need to install Node.js. To check the installed version of the node.js, open the command prompt, and run the npm -v command.
After node.js installed, the next step is to install the Angular CLI using this command.
npm install -g @angular/cli
g stands for global installation.To check the installed version of angular, open the command prompt and run theng version command.
After that installing angular CLI, you can use angular CLI to create a new angular project using the following command.
ng new RoutingDemo
This command creates a new project with all dependencies and packages.
Angular CLI includes a server so that you can serve your project locally.Navigate the newly created directory
cd RoutingDemo
To run the project, you can use this command.
ng serve --open
Open flag opens the project in your local browser automatically.Angular supports a live server, so you can see the changes of the project without refreshing your browser’s page.
To build the angular project, the build command can be used. An optimized build for production is made with the --prod flag.
ng build --prod
We can use different options to build the application.
-aot: Build using the ahead of time compiler. The Default value of this option is false.
-bashHref: Base URL of the application to build.
-build-optimizer: This flag --build-optimizer reduces the bundle sizes for the CSS and JavaScript files.
-crossOrigin: This attribute sets the element that provides CORS support. There are none, anonymous, use-credentials vales can be used. The Default value is none.
-allowedCommonJsDependencies: List of commonJs libraries that are allowed to be used without a build time warning.
-deleteOutputPath: delete the path before building.
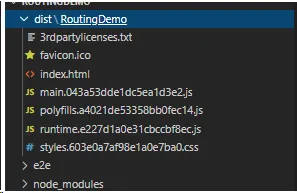
Once this command runs successfully, a distfolder is created in your project directory. Note that, in some cases, another subfolder with the name of your project will be created. This command will create the dist/RoutingDemo directory containing a minified, transpiled and ready to deploy version of your application. This is due to some settings in the angular.json file.
In the package.json file, the command to be written in the script section.
package.json
{ "name": "routing-demo", "version": "0.0.0", "scripts": { "ng": "ng", "start": "ng serve", "build": "ng build", "test": "ng test", "lint": "ng lint", "e2e": "ng e2e" }, "private": true, "dependencies": { "@angular/animations": "~10.0.14", "@angular/common": "~10.0.14", "@angular/compiler": "~10.0.14", "@angular/core": "~10.0.14", "@angular/forms": "~10.0.14", "@angular/platform-browser": "~10.0.14", "@angular/platform-browser-dynamic": "~10.0.14", "@angular/router": "~10.0.14", "bootstrap": "^4.5.2", "rxjs": "~6.5.5", "tslib": "^2.0.0", "zone.js": "~0.10.3" }, "devDependencies": { "@angular-devkit/build-angular": "~0.1000.8", "@angular/cli": "~10.0.8", "@angular/compiler-cli": "~10.0.14", "@types/node": "^12.11.1", "@types/jasmine": "~3.5.0", "@types/jasminewd2": "~2.0.3", "codelyzer": "^6.0.0", "jasmine-core": "~3.5.0", "jasmine-spec-reporter": "~5.0.0", "karma": "~5.0.0", "karma-chrome-launcher": "~3.1.0", "karma-coverage-istanbul-reporter": "~3.0.2", "karma-jasmine": "~3.3.0", "karma-jasmine-html-reporter": "^1.5.0", "protractor": "~7.0.0", "ts-node": "~8.3.0", "tslint": "~6.1.0", "typescript": "~3.9.5" } }
There are multiple ways to go to your web app, you can choose between a Consumption Plan and a Service Plan. Depending on the number of requests and data, you can choose a better option to use. If you don’t have a continu ous load on your service, the Consumption Plan can be a cheaper one. Here we are using an app service.
Steps for Deploying the project to Azure:
After you have finished entering details, click on Save and queue button. This will save the above options and subsequently runs the pipeline. You will see a message with a hyperlink containing a build number or you can navigate to Pipelines > Builds.
In this blog, we discussed how to create an angular project and build the project to Azure Web Services with simple steps. Azure web services accelerate your web development with a frontend development and backend service powered by serverless APIs.
Build Your Agile Team
It’s difficult to believe, but there are about 426 Business Intelligence tools available! And the leaders in this field are Tableau, holding a 12.37% market share, and Power BI, which...
Choosing between Databricks and Azure Synapse Analytics can feel like picking between two powerful data analytics tools, each with its own strengths and unique features. Azure Synapse...
Let's rewind to the 1990s. Data used to be stored on servers and CEOs relied on basic tools to make optimal decisions. No dashboards, nothing. When you use Power BI with a solid...