×

iFour Logo

A simple guide on Unit testing in Angular

Kapil Panchal - September 02, 2021

Listening is fun too.

Straighten your back and cherish with coffee - PLAY !

  • play
  • pause
  • pause
A simple guide on Unit testing in Angular

What is Unit Testing?


Unit Testing is the practice of testing small lonely pieces of code to ensure it is bug-free. However, it is also called as Isolated testing. If our test code utilizes any external resource, like the database, network, etc., then it is not a unit test.

Why do we use unit testing in Angular?


Unit tests are written using Jasmine (Jasmine is a behavior-driven development framework for testing JavaScript code.) and it is run to see if individual parts of an application are working accurately or not. Unit tests will either pass or fail as a result depending on if the code is working accurately or has any kind of bug in the tested part of an application. For the project's unit tests, angular use Karma as the test runner.

Why is unit testing important?


Ensures that all code meets quality standards prior to unit testing. This quality is uppermost. This ensures a reliable engineering environment. Unit testing helps with time saving, money saving, and better coding efficiency for developers.

How do you write an Angular test?


When we create a new project with the Angular CLI (ng new appName), a default component and test file are added. A test script is always created along with any component module (service, component) we create using the Angular CLI.

This default test script, is always added. Let’s see the app.component.spec.ts file:

 
import { TestBed, async } from '@angular/core/testing';
import { AppComponent } from './app.component';
describe('AppComponent', () => {
  beforeEach(async(() => {
    TestBed.configureTestingModule({
      declarations: [
        AppComponent
      ],
    }).compileComponents();
  }));
  it(it is create the app', async(() => {
    const fixture = TestBed.createComponent(AppComponent);
    const app = fixture.debugElement.componentInstance;
    expect(app).toBeTruthy();
  }));
  it(`should have as title of the app 'angular-unit-test'`, async(() => {
    const fixture = TestBed.createComponent(AppComponent);
    const app = fixture.debugElement.componentInstance;
    expect(app.title).toEqual('angular-unit-test');
  }));
  it(it is render title in a h1 tag', async(() => {
    const fixture = TestBed.createComponent(AppComponent);
    fixture.detectChanges();
    const compiled = fixture.debugElement.nativeElement;
    expect(compiled.querySelector('h1').textContent).toContain('Welcome to angular-unit-test!');
  }));
});
				

Nothing has changed yet Let’s run our first test :

 
ng test
				

How to perform a unit test in Angular?


The Angular testing package includes mainly two utilities which are called TestBed and async. TestBed is the main Angular utility package.

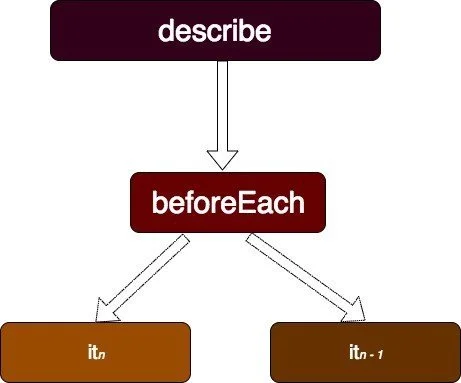
The describe container contains various blocks (xit, it, beforeEach, etc.). Before any other block beforeEach runs first.

The first block is the beforeEach inside the container. This block runs before any other block of the app.component.spec.ts file. The app module in app.module.ts file is declared in the beforeEach block. The main component beforeEach is what we want to have in this testing environment.

To compile our component’s resources like the template, styles etc the compileComponents object is called.


beforeEach(async(() => {
   TestBed.configureTestingModule({
      declarations: [
         AppComponent
      ],
   }).compileComponents();
}));
				

Now the component has been declared in the beforeEach block. let’s check if the component is created or not.


it('should create the app', async(() => {
    const fixture = TestBed.createComponent(AppComponent);
    const app = fixture.debugElement.componentInstance;
expect(app).toBeTruthy();
}));
				

The third block shows how we can have access to the properties of the created component. The default property title is. We can check title is change or not from the instance of the component created:


it(`title 'angular-unit-test'`, async(() => {
     const fixture = TestBed.createComponent(AppComponent);
     const app = fixture.debugElement.componentInstance;
     expect(app.title).toEqual('angular-unit-test');
}));
				

The fourth block shows how the test behaves in the browser environment. Once the component is created, it is called an example of the component created for the emulation running in the browser environment. Now that the component has been rendered, we can have access to its child element by accessing the nativeElelment object of the rendered component:


it('title is render in h1 tag', async(() => {
   const fixture = TestBed.createComponent(AppComponent);
   fixture.detectChanges();
   const compiled = fixture.debugElement.nativeElement;
 expect(compiled.querySelector('h1').textContent).toContain('Welcome to angular-unit-test!');
}));
				

let’s test our Angular example application.

How to test an Angular component?


In our example of Angular unit testing, the service is injected into the QuoteComponent to access its properties, which will be needed by the view:

 
import { Component, OnInit } from '@angular/core';
import { QuoteService } from '../service/Quote.service';
import { QuoteModel } from '../model/QuoteModel';
@Component({
  selector: 'app-Quotes',
  templateUrl: './Quotes.component.html',
  styleUrls: ['./Quotes.component.css']})
export class QuotesComponent implements OnInit {
  public quoteList: QuoteModel[];
  public quoteText: String = null;
  constructor(private service: QuoteService) { }
  ngOnInit() {
    this.quoteList = this.service.getQuote();
  }
  createNewQuote() {
    this.service.addNewQuote(this.quoteText);
    this.quoteText = null;
  }
  removeQuote(index) {
    this.service.removeQuote(index);
  }
}
				

The first two blocks in the describe container run consecutively. In the first block, the form module is imported into the configuration test. This is used ngModel as a form-related directive.

Also, QuotesComponent is also declared in configTestMod in the same as components are declared in ngModule of the appModule file. The second block creates a QuoteComponent and its instance, which is used by the other blocks:

 
let component: QuotesComponent;
  let fixture: ComponentFixture;
  beforeEach(() => {
    TestBed.configureTestingModule({
      imports: [FormsModule],
      declarations: [QuotesComponent]
    });
  });
  beforeEach(() => {
    fixture = TestBed.createComponent(QuotesComponent);
    component = fixture.debugElement.componentInstance;
  });


If the instance of the component is created then this block tests :

 
it("should create Quote component", () => {
    expect(component).toBeTruthy();
  });
				

The manipulation of all operations are injected service handles. The quoteService variable holds the injected service (QuoteService). Here, the component is yet to be rendered until the detectChanges method is called:

 
it("quoteList of service", () => {
    const quoteService = fixture.debugElement.injector.get(QuoteService);
    fixture.detectChanges();
    expect(quoteService.getQuote()).toEqual(component.quoteList);
  });
				

Now we test successfully create a post. The nativeElement object gives access to the HTML element.

 
it("it is generate post", () => {
    component.quoteText = "I love this test";
    fixture.detectChanges();
    const compiled = fixture.debugElement.nativeElement;
    expect(compiled.innerHTML).toContain("I love this test");
  });
				

In addition to accessing HTML content, you can also access an element through its CSS property. The button is disabled when the QuoteTextModel is empty or empty:

 
it("textArea is empty then disable button", () => {
    fixture.detectChanges();
    const button = fixture.debugElement.query(By.css("button"));
    expect(button.nativeElement.disabled).toBeTruthy();
  });
it("textArea is not empty then enable button", () => {
    component.quoteText = "I love this test";
    fixture.detectChanges();
    const button = fixture.debugElement.query(By.css("button"));
    expect(button.nativeElement.disabled).toBeFalsy();
  });
				

The way we access an element with its CSS properties, we can also access an element by its class name. The button clicks are fired by calling the triggerEventHandler . The click event type is specified. A quote displayed deleted from the quoteList when clicked on:

 
it("it is delete post", () => {
    component.quoteText = "This is a newly fresh post";
    fixture.detectChanges();
    fixture.debugElement
      .query(By.css(".row"))
      .query(By.css(".card"))
      .triggerEventHandler("click", null);
    const compiled = fixture.debugElement.nativeElement;
    expect(compiled.innerHTML).toContain("This is a newly fresh post");
  });
				

Conclusion


Unit tests ensure that each angular component or angular service of our angular application works as expected. In this blog, we demonstrated how to write unit tests, how to perform a unit test in Angular, and how to test an Angular service as well as an Angular component.

A simple guide on Unit testing in Angular Table of Content 1. What is Unit Testing? 2. Why do we use unit testing in Angular? 3. Why is unit testing important? 4. How do you write an Angular test? 5. How to perform a unit test in Angular? 6. How to test an Angular service? 7. How to test an Angular component? 8. Conclusion In this Angular blog, we will learn how to build a simple Angular app and then learn about the unit testing process step by step with examples. What is Unit Testing? Unit Testing is the practice of testing small lonely pieces of code to ensure it is bug-free. However, it is also called as Isolated testing. If our test code utilizes any external resource, like the database, network, etc., then it is not a unit test. Why do we use unit testing in Angular? Unit tests are written using Jasmine (Jasmine is a behavior-driven development framework for testing JavaScript code.) and it is run to see if individual parts of an application are working accurately or not. Unit tests will either pass or fail as a result depending on if the code is working accurately or has any kind of bug in the tested part of an application. For the project's unit tests, angular use Karma as the test runner. Why is unit testing important? Ensures that all code meets quality standards prior to unit testing. This quality is uppermost. This ensures a reliable engineering environment. Unit testing helps with time saving, money saving, and better coding efficiency for developers. How do you write an Angular test? When we create a new project with the Angular CLI (ng new appName), a default component and test file are added. A test script is always created along with any component module (service, component) we create using the Angular CLI. This default test script, is always added. Let’s see the app.component.spec.ts file:   import { TestBed, async } from '@angular/core/testing'; import { AppComponent } from './app.component'; describe('AppComponent', () => { beforeEach(async(() => { TestBed.configureTestingModule({ declarations: [ AppComponent ], }).compileComponents(); })); it(it is create the app', async(() => { const fixture = TestBed.createComponent(AppComponent); const app = fixture.debugElement.componentInstance; expect(app).toBeTruthy(); })); it(`should have as title of the app 'angular-unit-test'`, async(() => { const fixture = TestBed.createComponent(AppComponent); const app = fixture.debugElement.componentInstance; expect(app.title).toEqual('angular-unit-test'); })); it(it is render title in a h1 tag', async(() => { const fixture = TestBed.createComponent(AppComponent); fixture.detectChanges(); const compiled = fixture.debugElement.nativeElement; expect(compiled.querySelector('h1').textContent).toContain('Welcome to angular-unit-test!'); })); }); Nothing has changed yet Let’s run our first test :   ng test Read More: A Seamless Guide On Angular Material Menu Component How to perform a unit test in Angular? The Angular testing package includes mainly two utilities which are called TestBed and async. TestBed is the main Angular utility package. [Unit Test] The describe container contains various blocks (xit, it, beforeEach, etc.). Before any other block beforeEach runs first. The first block is the beforeEach inside the container. This block runs before any other block of the app.component.spec.ts file. The app module in app.module.ts file is declared in the beforeEach block. The main component beforeEach is what we want to have in this testing environment. To compile our component’s resources like the template, styles etc the compileComponents object is called.   beforeEach(async(() => { TestBed.configureTestingModule({ declarations: [ AppComponent ], }).compileComponents(); })); Now the component has been declared in the beforeEach block. let’s check if the component is created or not.   it('should create the app', async(() => { const fixture = TestBed.createComponent(AppComponent); const app = fixture.debugElement.componentInstance; expect(app).toBeTruthy(); })); The third block shows how we can have access to the properties of the created component. The default property title is. We can check title is change or not from the instance of the component created:   it(`title 'angular-unit-test'`, async(() => { const fixture = TestBed.createComponent(AppComponent); const app = fixture.debugElement.componentInstance; expect(app.title).toEqual('angular-unit-test'); })); The fourth block shows how the test behaves in the browser environment. Once the component is created, it is called an example of the component created for the emulation running in the browser environment. Now that the component has been rendered, we can have access to its child element by accessing the nativeElelment object of the rendered component:   it('title is render in h1 tag', async(() => { const fixture = TestBed.createComponent(AppComponent); fixture.detectChanges(); const compiled = fixture.debugElement.nativeElement; expect(compiled.querySelector('h1').textContent).toContain('Welcome to angular-unit-test!'); })); let’s test our Angular example application. How to test an Angular service? Services in Angular injects into the constructor. Services often depend on other service. Many times, it’s easy to create and inject these dependencies by adding providedIn: root to the injectable object which makes it accessible by any component or service: Ways to test the QuoteService class:   import { QuoteService } from "./Quote.service"; describe("QuoteService", () => { let service: QuoteService; beforeEach(() => { service = new QuoteService(); }); it("it is create a post in the array", () => { const qouteText = "This is message"; service.addNewQuote(qouteText); expect(service.quoteList.length).toBeGreaterThanOrEqual(1); }); it("it is delete created post from array", () => { service.addNewQuote("This is message"); service.removeQuote(0); expect(service.quoteList.length).toBeLessThan(1); }); }); In the first block, an instance of QuoteService is created.   it("it is generate post in array", () => { const qouteText = "This is message"; service.addNewQuote(qouteText); expect(service.quoteList.length).toBeGreaterThanOrEqual(1); }); The post model QuoteModel(text, date) is created into an array. we can check it by checking length of array. The length of the quoteList is expected to be 1:   it("it is delete generated post", () => { service.addNewQuote("This is message"); service.removeQuote(0); expect(service.quoteList.length).toBeLessThan(1); }); The second block creates a post in an array. Searching for Reliable AngularJS Development Services ? CONTACT US How to test an Angular component? In our example of Angular unit testing, the service is injected into the QuoteComponent to access its properties, which will be needed by the view:   import { Component, OnInit } from '@angular/core'; import { QuoteService } from '../service/Quote.service'; import { QuoteModel } from '../model/QuoteModel'; @Component({ selector: 'app-Quotes', templateUrl: './Quotes.component.html', styleUrls: ['./Quotes.component.css']}) export class QuotesComponent implements OnInit { public quoteList: QuoteModel[]; public quoteText: String = null; constructor(private service: QuoteService) { } ngOnInit() { this.quoteList = this.service.getQuote(); } createNewQuote() { this.service.addNewQuote(this.quoteText); this.quoteText = null; } removeQuote(index) { this.service.removeQuote(index); } } The first two blocks in the describe container run consecutively. In the first block, the form module is imported into the configuration test. This is used ngModel as a form-related directive. Also, QuotesComponent is also declared in configTestMod in the same as components are declared in ngModule of the appModule file. The second block creates a QuoteComponent and its instance, which is used by the other blocks:   let component: QuotesComponent; let fixture: ComponentFixture; beforeEach(() => { TestBed.configureTestingModule({ imports: [FormsModule], declarations: [QuotesComponent] }); }); beforeEach(() => { fixture = TestBed.createComponent(QuotesComponent); component = fixture.debugElement.componentInstance; }); If the instance of the component is created then this block tests :   it("should create Quote component", () => { expect(component).toBeTruthy(); }); The manipulation of all operations are injected service handles. The quoteService variable holds the injected service (QuoteService). Here, the component is yet to be rendered until the detectChanges method is called:   it("quoteList of service", () => { const quoteService = fixture.debugElement.injector.get(QuoteService); fixture.detectChanges(); expect(quoteService.getQuote()).toEqual(component.quoteList); }); Now we test successfully create a post. The nativeElement object gives access to the HTML element.   it("it is generate post", () => { component.quoteText = "I love this test"; fixture.detectChanges(); const compiled = fixture.debugElement.nativeElement; expect(compiled.innerHTML).toContain("I love this test"); }); In addition to accessing HTML content, you can also access an element through its CSS property. The button is disabled when the QuoteTextModel is empty or empty:   it("textArea is empty then disable button", () => { fixture.detectChanges(); const button = fixture.debugElement.query(By.css("button")); expect(button.nativeElement.disabled).toBeTruthy(); }); it("textArea is not empty then enable button", () => { component.quoteText = "I love this test"; fixture.detectChanges(); const button = fixture.debugElement.query(By.css("button")); expect(button.nativeElement.disabled).toBeFalsy(); }); The way we access an element with its CSS properties, we can also access an element by its class name. The button clicks are fired by calling the triggerEventHandler . The click event type is specified. A quote displayed deleted from the quoteList when clicked on:   it("it is delete post", () => { component.quoteText = "This is a newly fresh post"; fixture.detectChanges(); fixture.debugElement .query(By.css(".row")) .query(By.css(".card")) .triggerEventHandler("click", null); const compiled = fixture.debugElement.nativeElement; expect(compiled.innerHTML).toContain("This is a newly fresh post"); }); Conclusion Unit tests ensure that each angular component or angular service of our angular application works as expected. In this blog, we demonstrated how to write unit tests, how to perform a unit test in Angular, and how to test an Angular service as well as an Angular component.
Kapil Panchal

Kapil Panchal

A passionate Technical writer and an SEO freak working as a Content Development Manager at iFour Technolab, USA. With extensive experience in IT, Services, and Product sectors, I relish writing about technology and love sharing exceptional insights on various platforms. I believe in constant learning and am passionate about being better every day.

Build Your Agile Team

Enter your e-mail address Please enter valid e-mail

Categories

Ensure your sustainable growth with our team

Talk to our experts
Sustainable
Sustainable
 
Blog Our insights
HR Analytics Dashboard – Key Metrics & Examples

HR analytics, generally known as People Analytics, could be a solid answer to those sceptics who believe that the HR department's role is just about hiring and making offers! This...

10 Executive Dashboard Examples for Consultants and CEOs

There is a principle behind every business. “If you don’t keep track of essentials, you won’t get clear direction, eventually causing your company to stumble.” To manage this scenario,...

How Spatial Data Analysis Improves Healthcare

Do you know when geospatial analysis took traction in healthcare? It was when John Snow, a London-based physician, used it to analyze the spread of cholera, which ultimately proved...