×

iFour Logo

What are Fallback and Target Null Values in WPF?

Kapil Panchal - February 11, 2021

Listening is fun too.

Straighten your back and cherish with coffee - PLAY !

  • play
  • pause
  • pause
What are Fallback and Target Null Values in WPF?

In WPF, Fallback is one of the features of binding fallback values. When we are working with the WPF there are many cases when we get the null values or not the correct binding for handle this type of situation WPF can provide us with Fallback values and Target Null Value. Two types of Fallback values are available.

  • TargetNullValue
  • FallbackValue

TargetNullValue is used when we want to display the alternate value when the object property is null. If the object value is null then the TargetNullValue will be set for the target. The target value is set when the bound property is null. Target Null Value defines in the System.Windows.Data namespace.


Syntax
	publicobjectTargetNullValue{ get; set; }


Fallback value

Fallback values are used to get or set the value when binding, unable to return a value and when binding fails. If there is a problem with binding or not able to resolve the binding source successfully at that time Fallback values are very useful.

Syntax
	publicobjectFallbackValue{ get; set; }
	

In this blog, we will introduce infinite scrolling in our Angular application. When we prepare an application, we deal with tons of files at the same time. In this situation, a question will be asked: how to display thousands of registrations on a single page?

It is not a good practice to load thousands of records at once on one page, and there are many benefits to implement infinite scrolling.

  • Increase the time on our web site so that we can have faster operations

  • Make it easy to increase the depth of the page

  • The minimum number of clicks required

  • Better user interface

  • Best in mobile layout

  • One of the major advantages is that it reduces the bounce rate of a website

To implement infinite scrolling in Angular, we can use an npm package named ngx-infinite-scroll.

To begin with infinite scrolling, we just need to create a new project by following some steps that are described below.

Create a new angular project according as per the following command:

ng new ngxInfiniteScrollerDemo                  
                

We have created two components in our project using the following commands:

ng generate component hello

ng generate component scrollContainer
                

Above is the basic step required to create a project with its required components, moreover, we need to install another npm package known as ngx-infinite-scroll, to work with infinite scrolling in our app, to do this we just need to use the below-mentioned npm:

npm install ngx-infinite-scroll
                

Besides the above dependencies, we used angular material to design our page, so we installed angular/cdk.

npm install @angular/cdk
                

To implement the infinite scroll, we will first design our user interface, so our app.component.html and app.component.css code snippet are the following:

App.component.html


        {{ column | titlecase }}
      
            {{ item[column] }}


App.component.css
:host {
  justify-content: flex-start;
  display: flex;
  flex-direction: column;
}

app-scroll-container {
  flex-grow: 0;
  flex-shrink: 0;
}

app-scroll-container.full {
  flex-basis: auto;
}

app-scroll-container.part {
  flex-basis: 200px;
}

.buttons {
  position: absolute;
  top: 0;
  right: 0;
  z-index: 1000;
}

We have created multiple arrays named with ELEMENT_DATA in which we have stored data like serial_no, name, weight, and height. Then we have used mat table to display the data through the getData() method like the following code:

App.component.ts
import { Component, OnInit, ViewChild } from '@angular/core';
import { Sort, MatSort, MatTableDataSource } from '@angular/material';
import { noop as _noop } from 'lodash-es';

interface Element {
  name: string;
  serial_no: number;
  weight: number;
  height: number;
}

const ELEMENT_DATA: Element[] = [
  {serial_no: 1, name: 'Bunty', weight: 50, height: 5.1},
  {serial_no: 2, name: 'Gaurav', weight: 52, height: 5.2},
  {serial_no: 3, name: 'Jayraj', weight: 69, height: 5.5},
  {serial_no: 4, name: 'Lokesh', weight: 90, height: 6},
  {serial_no: 5, name: 'Hardik', weight: 41, height: 5},
  {serial_no: 6, name: 'Sunil', weight: 27, height: 6},
  {serial_no: 7, name: 'Aniket', weight: 45, height: 4.5},
  {serial_no: 8, name: 'Jignesh', weight: 94, height: 6},
  {serial_no: 9, name: 'Abdul', weight: 84, height: 5},
  {serial_no: 10, name: 'James', weight: 29, height: 4},
  {serial_no: 11, name: 'Jigar', weight: 56, height: 5.1},
  {serial_no: 12, name: 'Jaimin', weight: 35, height: 5},
  {serial_no: 13, name: 'Nitin', weight: 68, height: 5.5},
  {serial_no: 14, name: 'Suhani', weight: 85, height: 3.5},
  {serial_no: 16, name: 'Lalit', weight: 36, height: 4},
  {serial_no: 17, name: 'Hiren', weight: 53, height: 4.5},
  {serial_no: 18, name: 'Himanshu', weight: 48, height: 4},
  {serial_no: 19, name: 'Piyush', weight: 93, height: 5},
  {serial_no: 20, name: 'Keval', weight: 78, height: 5.2},
];

@Component({
  selector: 'my-app',
  templateUrl: './app.component.html',
  styleUrls: [ './app.component.css' ]
})
export class AppComponent implements OnInit {

  dataSource: MatTableDataSource;
  limit: number = 1000;
  displayedColumns: string[] = ['serial_no', 'name', 'weight', 'height'];
  full: boolean = true;
  @ViewChild(MatSort) sort: MatSort;
  
  constructor() { }

  ngOnInit() {
    this.getData();
  }

  handleScroll = (scrolled: boolean) => {
    console.timeEnd('lastScrolled');
    scrolled ? this.getData() : _noop();
    console.time('lastScrolled');
  }
  hasMore = () => !this.dataSource || this.dataSource.data.length < this.limit;

  getData() {
    const data: Element[] = this.dataSource
      ? [...this.dataSource.data, ...ELEMENT_DATA]
      : ELEMENT_DATA;
    this.dataSource = new MatTableDataSource(data);
    this.dataSource.sort = this.sort;
  }
}
  

In our scroll-component we have created the methods to implement infinite scrolling, in these, we have provided some properties to an item to function with scrolling like the following:

  • infiniteScroll is the primary property that defines the content that is scrolling through.

  • infiniteScrollDistance is Used to provide the distance where we will reach the defined percentage of the item, at which time the scrolling event will be triggered.

  • infinteScrollThrottle indicates the number of milliseconds after the scrolling event will be triggered.

  • Scrolled is a method for carrying out a specific action when scrolling is reached.

  • In scrollWindow, we should decide if we want to listen to the window scroll or scroll event.

So, these are some of the properties we used in this demonstration project, but we can use more methods or properties depending on our requirements.

So, our code main to implement infinite scrolling is in our scroll-container like the following:

Scroll-container.component.ts
import { Component, OnInit, OnChanges, Input, Output, EventEmitter, HostListener, ElementRef } from '@angular/core';
import { throttle as _throttle, noop as _noop } from "lodash-es";

enum ScrollDirection {
  UP = 'up',
  DOWN = 'down'
}

enum ScrollListener {
  HOST = 'scroll',
  WINDOW = 'window:scroll'
}

@Component({
  selector: 'app-scroll-container',
  templateUrl: './scroll-container.component.html',
  styleUrls: ['./scroll-container.component.css']
})
export class ScrollContainerComponent implements OnInit, OnChanges {

  private _element: Element;
  private _window: Element;
  public scrollTop = 0;
  @Input() more = true;
  @Input() scrollDelay = 500;
  @Input() scrollOffset = 1000;
  @Output() scrolled: EventEmitter = new EventEmitter();
  @HostListener(ScrollListener.HOST) _scroll: Function;
  @HostListener(ScrollListener.WINDOW) _windowScroll: Function;

  constructor(private elRef: ElementRef) {
    this._element = this.elRef.nativeElement;
    this._window = document.documentElement as Element;
  }

  ngOnInit() {
    this.setThrottle();
  }

  ngOnChanges(changes) {
    if (changes.scrollDelay) this.setThrottle();
  }

  setThrottle() {
    this._scroll = this._windowScroll = _throttle(this.handleScroll, this.scrollDelay);
  }

  getListener = () => this.elRef.nativeElement.clientHeight === this.elRef.nativeElement.scrollHeight
    ? ScrollListener.WINDOW
: ScrollListener.HOST

  roundTo = (from: number, to: number = this.scrollOffset) => Math.floor(from / to) * to;
  getScrollDirection = (st: number) => this.scrollTop <= st ? ScrollDirection.DOWN : ScrollDirection.UP;

  canScroll(e: Element): boolean {
    const scrolled = this.more
      && this.getScrollDirection(e.scrollTop) === ScrollDirection.DOWN
      && this.roundTo(e.clientHeight) === this.roundTo(e.scrollHeight - e.scrollTop);
    this.scrollTop = e.scrollTop;
    return scrolled;
  }

  handleScroll = () => this.getListener() === ScrollListener.HOST
    ? this.scrolled.emit( this.canScroll(this._element) )
    : this.scrolled.emit( this.canScroll(this._window) )
}
 
Scroll-container.component.html

Looking for Trusted Angular Development Company? Enquire Today.

Our app.module.ts file looks like the following

App.module.ts

import { NgModule } from '@angular/core';
import { BrowserModule } from '@angular/platform-browser';
import { FormsModule } from '@angular/forms';
import { BrowserAnimationsModule } from '@angular/platform-browser/animations';
import { MatTableModule, MatSortModule, MatProgressSpinnerModule } from '@angular/material';

import { AppComponent } from './app.component';
import { HelloComponent } from './hello.component';
import { ScrollContainerComponent } from './scroll-container/scroll-container.component';

@NgModule({
  imports:      [ BrowserModule, FormsModule, BrowserAnimationsModule, MatTableModule, MatSortModule, MatProgressSpinnerModule ],
  declarations: [ AppComponent, HelloComponent, ScrollContainerComponent ],
  bootstrap:    [ AppComponent ]
})
export class AppModule { }

Output

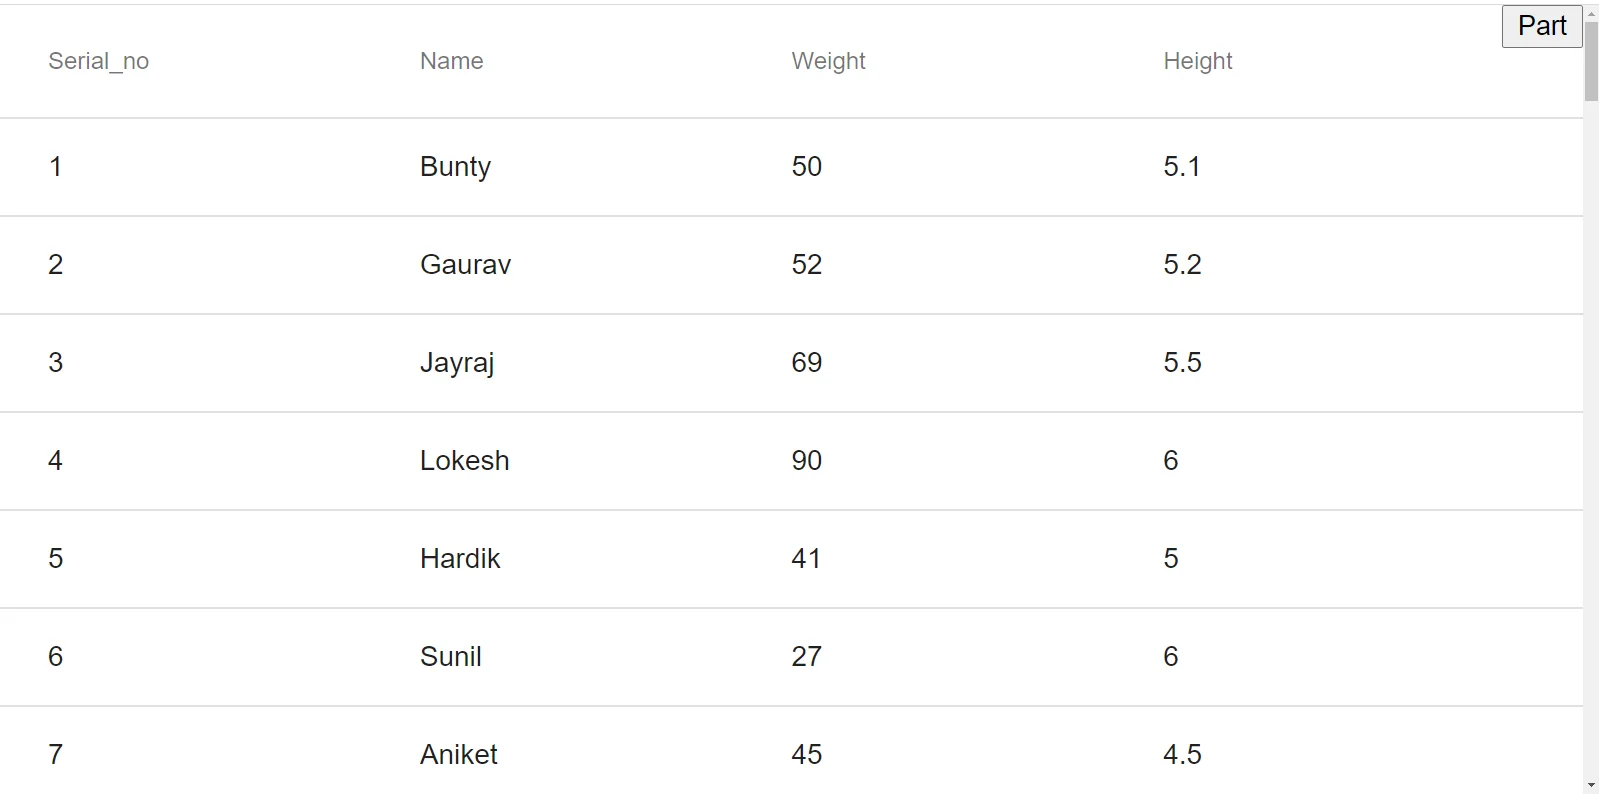
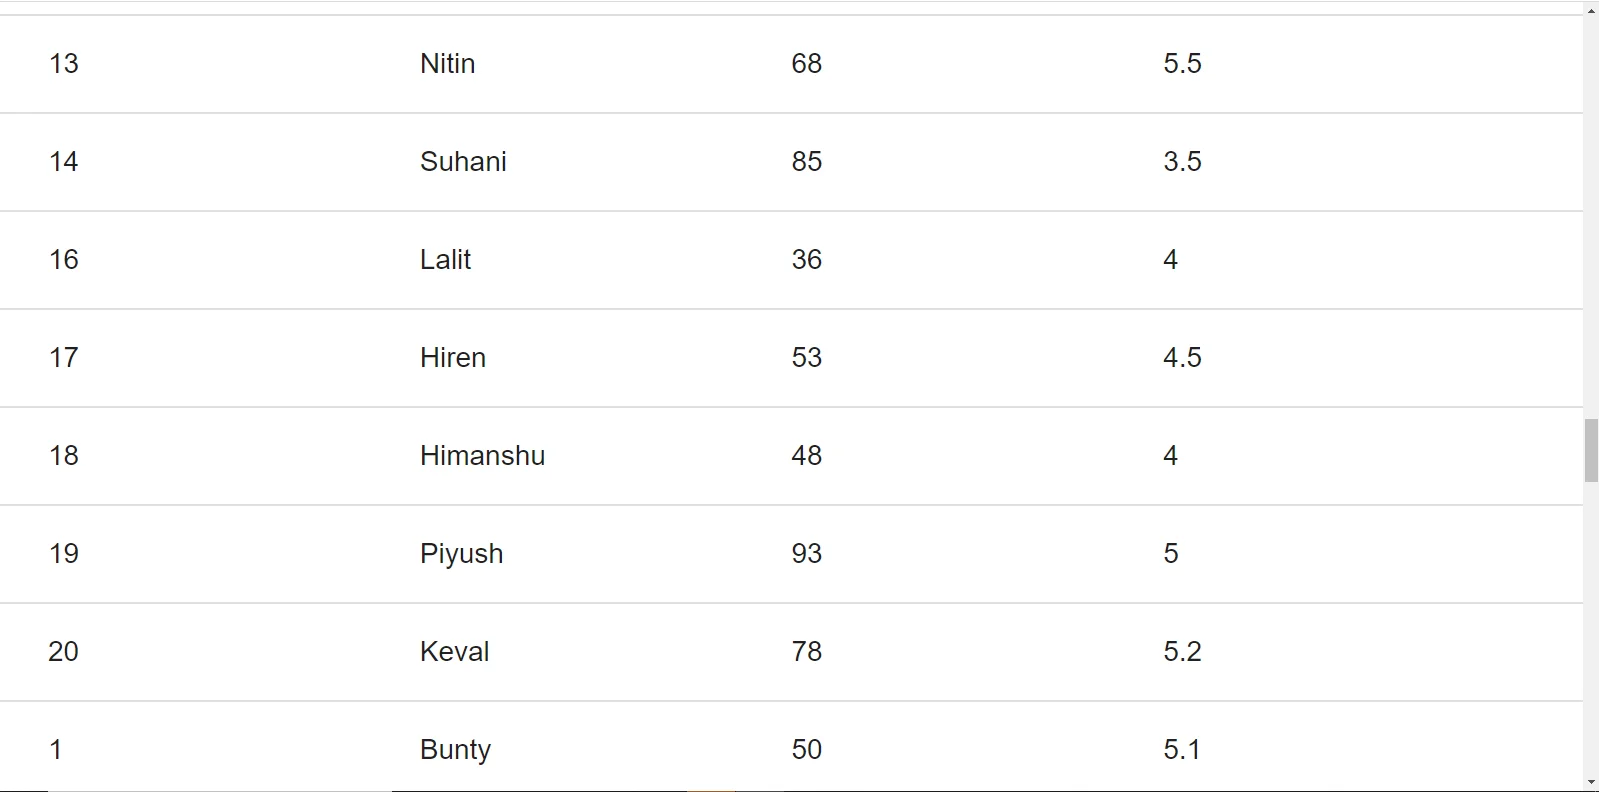
When we execute our project, we can see the output on the following screen.

Azure vs AWS

Figure 1: Output screen of our infinite scroller demo


Azure vs AWS

Figure 2: Output screen after scrolling

Conclusion


In this blog, we have discussed ngx infinite scrolling, discussed its properties and methods for implementing it. We have also implemented the demonstration project for a better understanding of it.

Fallback value Code

In this example, we can add a source of every image in our project but if any reason that our binding can fail and we want to display our default image so at that moment Fallback value is used.

Let’s took a simple example.


publicclassListofEmployee
        {
           publicstringNameOfEmployee{ get; set; }
           publicintStatusCode{ get; set; }
           publicbool? IsActive{ get; set; }
           publicDateTimeJoiningDate{ get; set; }
           publicDateTime? ResineDate{ get; set; }
        }
		

Here is a string, bool, int data type now we can set it to null and add their data in target null value.


	varem = newListofEmployee();
	em.NameOfEmployee = "Ifour Technolab";
	em.IsActive = null;
	em.JoiningDate = "01-01-2005";
	em.ResineDate = null;
	this.DataContext = em;
	

Here, we can set some property null to display alternate data.


This is simple binding using this binding format we can get null values. Now we can bind the properties with the target null value.


We can display checkbox checked property is false and set today’s date at this property.


Let’s see step by step how to create and use TargetNull value and Fallback value.


Step: 1

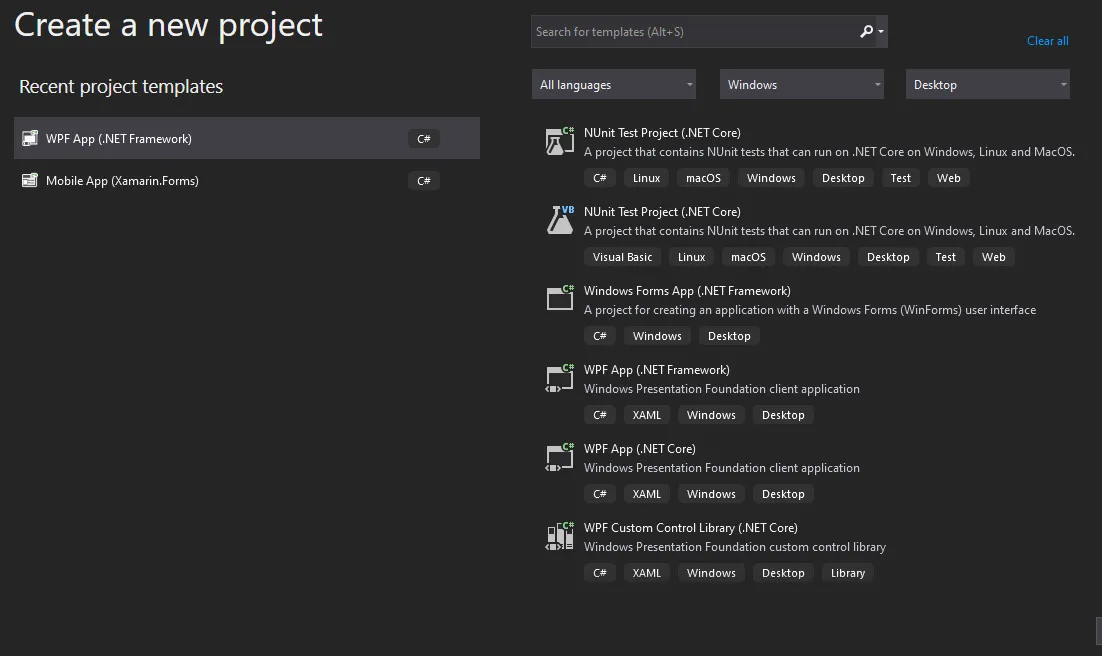
First of all, start the Visual Studio and select the WPF project.

ai-Hiring-banner

Image: Create a WPF project

After selecting the WPF App (.NET Framework), give it the appropriate name and click to create a button.

Step: 2

After creating a project just open MainWindow.Xaml file and add the below code or you can create a design that you want to show.


MainWindow.Xaml


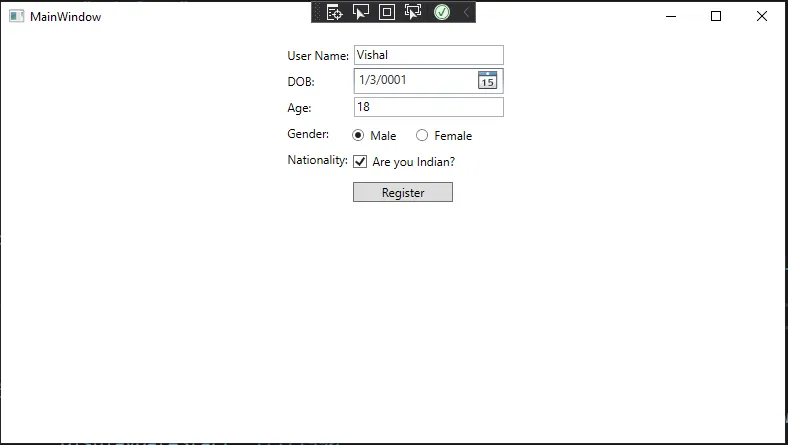
In this Xaml, we can add Labels, TextBlocks, RadioButton, CheckBox, TextBox, and Button. First, we can set the TargetNullValue and FallbackValue in Name TextBox when the binding fails and no data name can display that time default set name can display same as we can set Date of birth if no date can display then FallbackValue and TargetNullValue can display System date. Otherwise, we can set the default age 18 and set the checkBox checked in Nationality.

Wants to Talk with Our Highly Skilled WPF Developer ? Contact Now.


Step: 3

Now, create a folder give it to name ViewModel, in the folder create a class file name like MainViewModel, in this view model we can create a bindable property.

 
	usingPrism.Commands;
	usingPrism.Mvvm;
	using System;
	usingSystem.Collections.Generic;
	usingSystem.Linq;
	usingSystem.Text;
	usingSystem.Threading.Tasks;
	namespaceFallBackValues.ViewModel
	{
	publicclassMainViewModel :BindableBase
		{
	privatebool _isButtonClicked;
	publicboolIsButtonClicked
			{
	get{ return _isButtonClicked; }
	set{ SetProperty(ref _isButtonClicked, value); }
			}
	privatestring _nameofUser;
	publicstringNameofUser
			{
	get{ return _nameofUser; }
	set{ SetProperty(ref _nameofUser, value); }
			}
	privateDateTime _dob;
	publicDateTime DOB
			{
	get{ return _dob; }
	set
				{
	SetProperty(ref _dob, value);
				}
			}
	privatestring _age;
	publicstring Age
			{
	get{ return _age; }
	set
				{
	SetProperty(ref _age, value);
				}
			}
	privatebool _isNationalityIndian;
	publicboolIsNationalityIndian
			{
	get{ return _isNationalityIndian = true; }
	set{ SetProperty(ref _isNationalityIndian, value); }
			}
	privatebool _isMale = false;
	publicboolIsMale
			{
	get{ return _isMale; }
	set
				{
	SetProperty(ref _isMale, value);
				}
			}
	privatebool _isFeMale = false;
	publicboolIsFemale
			{
	get{ return _isFeMale; }
	set
				{
	SetProperty(ref _isFeMale, value);
				}
			}
	publicDelegateCommandRegisterButtonClicked{ get; set; }
	#region Constructor    
	publicMainViewModel()
			{
	RegisterButtonClicked = newDelegateCommand(RegisterUser);
			}
	#endregion
	#region Methods  
	privatevoidRegisterUser(objectobj)
			{
	IsButtonClicked = true;
			}
	#endregion
		}
	}
	
Output:
 

ai-Hiring-banner


Image: Example of TargetNull Value and Fallback Value

Conclusion


In this blog, we have learned how to use fallback values and target null values and when to use them. This is the use of display alternative data when binding fails.

 
What are Fallback and Target Null Values in WPF? In WPF, Fallback is one of the features of binding fallback values. When we are working with the WPF there are many cases when we get the null values or not the correct binding for handle this type of situation WPF can provide us with Fallback values and Target Null Value. Two types of Fallback values are available. TargetNullValue FallbackValue TargetNullValue is used when we want to display the alternate value when the object property is null. If the object value is null then the TargetNullValue will be set for the target. The target value is set when the bound property is null. Target Null Value defines in the System.Windows.Data namespace. Syntax publicobjectTargetNullValue{ get; set; } Fallback value Fallback values are used to get or set the value when binding, unable to return a value and when binding fails. If there is a problem with binding or not able to resolve the binding source successfully at that time Fallback values are very useful. Syntax publicobjectFallbackValue{ get; set; } In this blog, we will introduce infinite scrolling in our Angular application. When we prepare an application, we deal with tons of files at the same time. In this situation, a question will be asked: how to display thousands of registrations on a single page? It is not a good practice to load thousands of records at once on one page, and there are many benefits to implement infinite scrolling. Increase the time on our web site so that we can have faster operations Make it easy to increase the depth of the page The minimum number of clicks required Better user interface Best in mobile layout One of the major advantages is that it reduces the bounce rate of a website To implement infinite scrolling in Angular, we can use an npm package named ngx-infinite-scroll. To begin with infinite scrolling, we just need to create a new project by following some steps that are described below. Create a new angular project according as per the following command: ng new ngxInfiniteScrollerDemo We have created two components in our project using the following commands: ng generate component hello ng generate component scrollContainer Above is the basic step required to create a project with its required components, moreover, we need to install another npm package known as ngx-infinite-scroll, to work with infinite scrolling in our app, to do this we just need to use the below-mentioned npm: npm install ngx-infinite-scroll Besides the above dependencies, we used angular material to design our page, so we installed angular/cdk. npm install @angular/cdk To implement the infinite scroll, we will first design our user interface, so our app.component.html and app.component.css code snippet are the following: App.component.html {{ column | titlecase }} {{ item[column] }} App.component.css :host { justify-content: flex-start; display: flex; flex-direction: column; } app-scroll-container { flex-grow: 0; flex-shrink: 0; } app-scroll-container.full { flex-basis: auto; } app-scroll-container.part { flex-basis: 200px; } .buttons { position: absolute; top: 0; right: 0; z-index: 1000; } Read More: Error Handling Using Angular Rxjs We have created multiple arrays named with ELEMENT_DATA in which we have stored data like serial_no, name, weight, and height. Then we have used mat table to display the data through the getData() method like the following code: App.component.ts import { Component, OnInit, ViewChild } from '@angular/core'; import { Sort, MatSort, MatTableDataSource } from '@angular/material'; import { noop as _noop } from 'lodash-es'; interface Element { name: string; serial_no: number; weight: number; height: number; } const ELEMENT_DATA: Element[] = [ {serial_no: 1, name: 'Bunty', weight: 50, height: 5.1}, {serial_no: 2, name: 'Gaurav', weight: 52, height: 5.2}, {serial_no: 3, name: 'Jayraj', weight: 69, height: 5.5}, {serial_no: 4, name: 'Lokesh', weight: 90, height: 6}, {serial_no: 5, name: 'Hardik', weight: 41, height: 5}, {serial_no: 6, name: 'Sunil', weight: 27, height: 6}, {serial_no: 7, name: 'Aniket', weight: 45, height: 4.5}, {serial_no: 8, name: 'Jignesh', weight: 94, height: 6}, {serial_no: 9, name: 'Abdul', weight: 84, height: 5}, {serial_no: 10, name: 'James', weight: 29, height: 4}, {serial_no: 11, name: 'Jigar', weight: 56, height: 5.1}, {serial_no: 12, name: 'Jaimin', weight: 35, height: 5}, {serial_no: 13, name: 'Nitin', weight: 68, height: 5.5}, {serial_no: 14, name: 'Suhani', weight: 85, height: 3.5}, {serial_no: 16, name: 'Lalit', weight: 36, height: 4}, {serial_no: 17, name: 'Hiren', weight: 53, height: 4.5}, {serial_no: 18, name: 'Himanshu', weight: 48, height: 4}, {serial_no: 19, name: 'Piyush', weight: 93, height: 5}, {serial_no: 20, name: 'Keval', weight: 78, height: 5.2}, ]; @Component({ selector: 'my-app', templateUrl: './app.component.html', styleUrls: [ './app.component.css' ] }) export class AppComponent implements OnInit { dataSource: MatTableDataSource; limit: number = 1000; displayedColumns: string[] = ['serial_no', 'name', 'weight', 'height']; full: boolean = true; @ViewChild(MatSort) sort: MatSort; constructor() { } ngOnInit() { this.getData(); } handleScroll = (scrolled: boolean) => { console.timeEnd('lastScrolled'); scrolled ? this.getData() : _noop(); console.time('lastScrolled'); } hasMore = () => !this.dataSource || this.dataSource.data.length < this.limit; getData() { const data: Element[] = this.dataSource ? [...this.dataSource.data, ...ELEMENT_DATA] : ELEMENT_DATA; this.dataSource = new MatTableDataSource(data); this.dataSource.sort = this.sort; } } In our scroll-component we have created the methods to implement infinite scrolling, in these, we have provided some properties to an item to function with scrolling like the following: infiniteScroll is the primary property that defines the content that is scrolling through. infiniteScrollDistance is Used to provide the distance where we will reach the defined percentage of the item, at which time the scrolling event will be triggered. infinteScrollThrottle indicates the number of milliseconds after the scrolling event will be triggered. Scrolled is a method for carrying out a specific action when scrolling is reached. In scrollWindow, we should decide if we want to listen to the window scroll or scroll event. So, these are some of the properties we used in this demonstration project, but we can use more methods or properties depending on our requirements. So, our code main to implement infinite scrolling is in our scroll-container like the following: Scroll-container.component.ts import { Component, OnInit, OnChanges, Input, Output, EventEmitter, HostListener, ElementRef } from '@angular/core'; import { throttle as _throttle, noop as _noop } from "lodash-es"; enum ScrollDirection { UP = 'up', DOWN = 'down' } enum ScrollListener { HOST = 'scroll', WINDOW = 'window:scroll' } @Component({ selector: 'app-scroll-container', templateUrl: './scroll-container.component.html', styleUrls: ['./scroll-container.component.css'] }) export class ScrollContainerComponent implements OnInit, OnChanges { private _element: Element; private _window: Element; public scrollTop = 0; @Input() more = true; @Input() scrollDelay = 500; @Input() scrollOffset = 1000; @Output() scrolled: EventEmitter = new EventEmitter(); @HostListener(ScrollListener.HOST) _scroll: Function; @HostListener(ScrollListener.WINDOW) _windowScroll: Function; constructor(private elRef: ElementRef) { this._element = this.elRef.nativeElement; this._window = document.documentElement as Element; } ngOnInit() { this.setThrottle(); } ngOnChanges(changes) { if (changes.scrollDelay) this.setThrottle(); } setThrottle() { this._scroll = this._windowScroll = _throttle(this.handleScroll, this.scrollDelay); } getListener = () => this.elRef.nativeElement.clientHeight === this.elRef.nativeElement.scrollHeight ? ScrollListener.WINDOW : ScrollListener.HOST roundTo = (from: number, to: number = this.scrollOffset) => Math.floor(from / to) * to; getScrollDirection = (st: number) => this.scrollTop <= st ? ScrollDirection.DOWN : ScrollDirection.UP; canScroll(e: Element): boolean { const scrolled = this.more && this.getScrollDirection(e.scrollTop) === ScrollDirection.DOWN && this.roundTo(e.clientHeight) === this.roundTo(e.scrollHeight - e.scrollTop); this.scrollTop = e.scrollTop; return scrolled; } handleScroll = () => this.getListener() === ScrollListener.HOST ? this.scrolled.emit( this.canScroll(this._element) ) : this.scrolled.emit( this.canScroll(this._window) ) } Scroll-container.component.html Looking for Trusted Angular Development Company? Enquire Today. See here Our app.module.ts file looks like the following App.module.ts import { NgModule } from '@angular/core'; import { BrowserModule } from '@angular/platform-browser'; import { FormsModule } from '@angular/forms'; import { BrowserAnimationsModule } from '@angular/platform-browser/animations'; import { MatTableModule, MatSortModule, MatProgressSpinnerModule } from '@angular/material'; import { AppComponent } from './app.component'; import { HelloComponent } from './hello.component'; import { ScrollContainerComponent } from './scroll-container/scroll-container.component'; @NgModule({ imports: [ BrowserModule, FormsModule, BrowserAnimationsModule, MatTableModule, MatSortModule, MatProgressSpinnerModule ], declarations: [ AppComponent, HelloComponent, ScrollContainerComponent ], bootstrap: [ AppComponent ] }) export class AppModule { } Output When we execute our project, we can see the output on the following screen. Figure 1: Output screen of our infinite scroller demo   Figure 2: Output screen after scrolling Conclusion In this blog, we have discussed ngx infinite scrolling, discussed its properties and methods for implementing it. We have also implemented the demonstration project for a better understanding of it. In this example, we can add a source of every image in our project but if any reason that our binding can fail and we want to display our default image so at that moment Fallback value is used. Let’s took a simple example.   publicclassListofEmployee { publicstringNameOfEmployee{ get; set; } publicintStatusCode{ get; set; } publicbool? IsActive{ get; set; } publicDateTimeJoiningDate{ get; set; } publicDateTime? ResineDate{ get; set; } } Here is a string, bool, int data type now we can set it to null and add their data in target null value.   varem = newListofEmployee(); em.NameOfEmployee = "Ifour Technolab"; em.IsActive = null; em.JoiningDate = "01-01-2005"; em.ResineDate = null; this.DataContext = em; Here, we can set some property null to display alternate data.   This is simple binding using this binding format we can get null values. Now we can bind the properties with the target null value. We can display checkbox checked property is false and set today’s date at this property.   Read More: Introduction To Datacontext And Autowire In Wpf Let’s see step by step how to create and use TargetNull value and Fallback value. Step: 1 First of all, start the Visual Studio and select the WPF project. Image: Create a WPF project After selecting the WPF App (.NET Framework), give it the appropriate name and click to create a button. Step: 2 After creating a project just open MainWindow.Xaml file and add the below code or you can create a design that you want to show. MainWindow.Xaml In this Xaml, we can add Labels, TextBlocks, RadioButton, CheckBox, TextBox, and Button. First, we can set the TargetNullValue and FallbackValue in Name TextBox when the binding fails and no data name can display that time default set name can display same as we can set Date of birth if no date can display then FallbackValue and TargetNullValue can display System date. Otherwise, we can set the default age 18 and set the checkBox checked in Nationality. Wants to Talk with Our Highly Skilled WPF Developer ? Contact Now. See here   Step: 3 Now, create a folder give it to name ViewModel, in the folder create a class file name like MainViewModel, in this view model we can create a bindable property.   usingPrism.Commands; usingPrism.Mvvm; using System; usingSystem.Collections.Generic; usingSystem.Linq; usingSystem.Text; usingSystem.Threading.Tasks; namespaceFallBackValues.ViewModel { publicclassMainViewModel :BindableBase { privatebool _isButtonClicked; publicboolIsButtonClicked { get{ return _isButtonClicked; } set{ SetProperty(ref _isButtonClicked, value); } } privatestring _nameofUser; publicstringNameofUser { get{ return _nameofUser; } set{ SetProperty(ref _nameofUser, value); } } privateDateTime _dob; publicDateTime DOB { get{ return _dob; } set { SetProperty(ref _dob, value); } } privatestring _age; publicstring Age { get{ return _age; } set { SetProperty(ref _age, value); } } privatebool _isNationalityIndian; publicboolIsNationalityIndian { get{ return _isNationalityIndian = true; } set{ SetProperty(ref _isNationalityIndian, value); } } privatebool _isMale = false; publicboolIsMale { get{ return _isMale; } set { SetProperty(ref _isMale, value); } } privatebool _isFeMale = false; publicboolIsFemale { get{ return _isFeMale; } set { SetProperty(ref _isFeMale, value); } } publicDelegateCommandRegisterButtonClicked{ get; set; } #region Constructor publicMainViewModel() { RegisterButtonClicked = newDelegateCommand(RegisterUser); } #endregion #region Methods privatevoidRegisterUser(objectobj) { IsButtonClicked = true; } #endregion } } Output:     Image: Example of TargetNull Value and Fallback Value Conclusion In this blog, we have learned how to use fallback values and target null values and when to use them. This is the use of display alternative data when binding fails.  
Kapil Panchal

Kapil Panchal

A passionate Technical writer and an SEO freak working as a Content Development Manager at iFour Technolab, USA. With extensive experience in IT, Services, and Product sectors, I relish writing about technology and love sharing exceptional insights on various platforms. I believe in constant learning and am passionate about being better every day.

Build Your Agile Team

Categories

Ensure your sustainable growth with our team

Talk to our experts
Sustainable
Sustainable
 
Blog Our insights
16 Power BI Dashboard Design Mistakes to Avoid

Avoiding dashboard design mistakes is like hosting a dinner party. Just as you need to plan the menu and seating arrangement carefully, you need to design Power BI dashboards thoughtfully. For...

Types of Power BI Licenses & Their User Personas

Choosing the right Power BI license, especially when each one has remarkable and unique features, can be daunting and confusing. But, if you understand your requirements and see which...

HR Analytics Dashboard – Key Metrics & Examples

HR analytics, generally known as People Analytics, could be a solid answer to those sceptics who believe that the HR department's role is just about hiring and making offers! This...